Cloud Firestore
 環境構築
環境構築
とりあえずSampleプロジェクトを立てて、Cloud Firestoreを使って見る

セキュリティルール
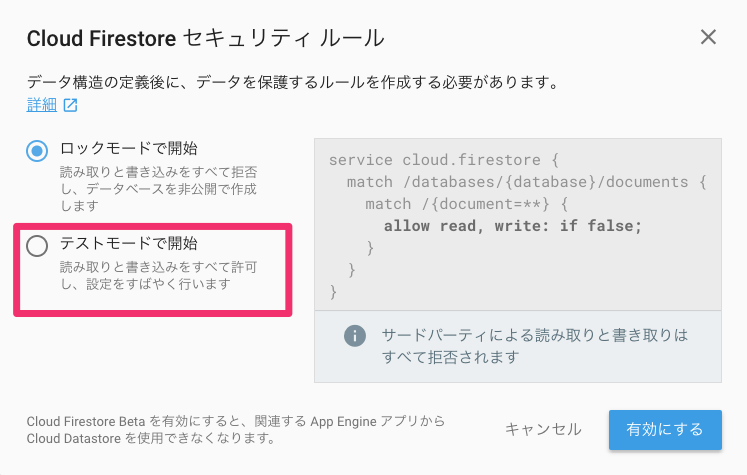
とりあえず「テストモード」で開始する
とりあえず「テストモード」で開始する
セキュリティルール
- テストモードで作られたrules
service cloud.firestore { match /databases/{database}/documents { match /{document=**} { allow read, write; } } } - ログインしているユーザー全員にデータを読ませる場合
service cloud.firestore {
  match /databases/{database}/documents {
        match /{document=**}{
            allow read, write:if request.auth != null;
        }
  }
}
コレクション/ドキュメント
- コレクション
- ドキュメントを含んだ単なるコンテナ
- ドキュメント
- フィールド(例、名字、名前、年齢、性別、、、)を含んだ一意の名前のレコード
 実装
実装
簡単なサンプル
まずは試せる最小の構成を作成
html
<!DOCTYPE html>
<html lang="ja">
  <head>
    <meta charset="utf-8">
    <meta name="viewport" content="width=device-width, initial-scale=1,user-scalable=no">
    <title>Google Firestore Sample</title>
  </head>
  <body>
    <div class="container"></div>

    <script src="https://cdnjs.cloudflare.com/ajax/libs/jquery/3.0.0-alpha1/jquery.min.js"></script>
    <script src="https://www.gstatic.com/firebasejs/4.10.1/firebase.js"></script>
    <script src="https://www.gstatic.com/firebasejs/4.10.1/firebase-firestore.js"></script>
    <script>
      // Initialize Firebase
      var config = {
        apiKey: "XXXXXXXXXXXXXXXXXXXXXXXXXX,
        authDomain: "xxxxxx.firebaseapp.com",
        databaseURL: "https://xxxxxx.firebaseio.com",
        projectId: "xxxxxxx",
        storageBucket: "xxxxxx.appspot.com",
        messagingSenderId: "xxxxxxxxxxxx"
      };
      firebase.initializeApp(config);
    </script>
  </body>
</html>
configの所は適時置き換えデータの読み込み
特定のパスを直接指定して値を読み込んで見たいと思います。
html
    <div class="container">
      <p class="text"></p>
    </div>
jsの部分 (今回は誰でも触れるrulesでやってます)
js
      const db = firebase.firestore();
      // データ読み込み
      const ref = db.doc('/xxxxx/xxxxxx');
      ref.get().then((doc) => {
        if (doc && doc.exists) {
          console.log(doc.data());
          $('.container .text').text(doc.data().value);
        }
      }).catch((error) => console.error(error));
データの書き込み
js
      // データの書き込み
      $('.container > .form > .send').click(() => {
        ref.set({
          name: $('.container > .form > .name').val()
        }).then(() => {
          console.log('write success!');
        }).catch((error) => console.error(error))
      });
※
updateと違ってドキュメント全てを置き換えるので注意!データの監視
js
      // データの監視
      ref.onSnapshot({includeMetadataChanges: true}, (doc) => {
        if (doc && doc.exists) {
          $('.container .text').text(doc.data().name);
        }
      });


 バッドノウハウ