2019年1月30日水曜日
2019年1月18日金曜日
MaterialSearchViewを使う前に知っておいて欲しいこと
MaterialSearchViewとは?
虫ネガネアイコンを押すと、検索窓がニュッと出てきて検索可能にする便利なライブラリです。
イメージとしては↓の様な感じのもの(公式より)
💻環境構築
app/build.gradleに以下を追加しライブラリをプロジェクトに追加
implementation 'br.com.mauker.materialsearchview:materialsearchview:1.2.3'
次にSuggestions用にContentProviderを使っているっぽいので、
br.com.mauker パッケージを作成し、MsvAuthority.kt を作成
package br.com.mauker
object MsvAuthority {
const val CONTENT_AUTHORITY: String = "${BuildConfig.APPLICATION_ID}.material_search_view"
}
AndroidManifestに以下を追加
<application ... >
<provider
android:name="br.com.mauker.materialsearchview.db.HistoryProvider"
android:authorities="${applicationId}.material_search_view"
android:exported="false"
android:protectionLevel="signature"
android:syncable="true"/>
</application>
STG/PRO用など、環境毎にアプリを共存させたいので以下の様に
android:authorities="${applicationId}.material_search_view"
BuildVariantで異なるアプリケーションIDをauthoritiesに含めて設定しておきます。
この時点でビルドして通ればOK 👌
📝 実装
シンプルな検索画面を作成する
1 SearchActivityの作成
- 空のActivityを作成
2 スタイルの設定
<style name="MaterialSearchViewStyle">
<item name="searchBackground">@color/white_ish</item>
<item name="searchVoiceIcon">@drawable/ic_action_voice_search</item>
<item name="searchCloseIcon">@drawable/ic_action_navigation_close</item>
<item name="searchBackIcon">@drawable/ic_action_navigation_close</item>
<item name="searchSuggestionBackground">@color/search_layover_bg</item>
<item name="historyIcon">@drawable/ic_history_white</item>
<item name="suggestionIcon">@drawable/ic_action_search_white</item>
<item name="listTextColor">@color/white_ish</item>
<item name="searchBarHeight">?attr/actionBarSize</item>
<item name="voiceHintPrompt">@string/hint_prompt</item>
<item name="android:textColor">@color/black</item>
<item name="android:textColorHint">@color/gray_50</item>
<item name="android:hint">@string/search_hint</item>
<item name="android:inputType">textCapWords</item>
</style>
3 レイアウトファイルにMaterialSearchViewを追加
<?xml version="1.0" encoding="utf-8"?>
<androidx.constraintlayout.widget.ConstraintLayout
xmlns:android="http://schemas.android.com/apk/res/android"
xmlns:tools="http://schemas.android.com/tools"
android:layout_width="match_parent"
android:layout_height="match_parent"
tools:context="xxxxxxxxx.SearchActivity">
<androidx.appcompat.widget.Toolbar
android:id="@+id/searchToolbar"
android:layout_width="match_parent"
android:layout_height="wrap_content"
android:minHeight="?attr/actionBarSize"
android:background="@color/colorPrimary"
app:theme="@style/ToolbarTheme" />
<br.com.mauker.materialsearchview.MaterialSearchView
android:id="@+id/searchView"
android:layout_width="match_parent"
android:layout_height="match_parent"
style="@style/MaterialSearchViewStyle"/>
</androidx.constraintlayout.widget.ConstraintLayout>
4 res/menu/search_menu.xml の作成
<?xml version="1.0" encoding="utf-8"?>
<menu xmlns:android="http://schemas.android.com/apk/res/android"
xmlns:app="http://schemas.android.com/apk/res-auto">
<item
android:id="@+id/action_search"
android:icon="@drawable/ic_action_search_white"
android:orderInCategory="100"
android:title="@string/abc_search_hint"
app:showAsAction="always" />
</menu>
5 SearchActivity の実装
class SearchActivity : AppCompatActivity() {
override fun onCreate(savedInstanceState: Bundle?) {
super.onCreate(savedInstanceState)
setContentView(R.layout.activity_search)
initToolbar()
}
private fun initToolbar() {
setSupportActionBar(searchToolbar)
val actionBar = supportActionBar
if (actionBar != null) {
actionBar.setDisplayHomeAsUpEnabled(true)
actionBar.setHomeButtonEnabled(true)
actionBar.setTitle(R.string.back)
searchToolbar.setNavigationOnClickListener {
finish()
}
}
}
override fun onCreateOptionsMenu(menu: Menu?): Boolean {
menuInflater.inflate(R.menu.search_menu, menu)
return true
}
override fun onOptionsItemSelected(item: MenuItem?): Boolean {
when (item?.itemId) {
R.id.action_search -> {
searchView.openSearch()
return true
}
}
return super.onOptionsItemSelected(item)
}
override fun onBackPressed() {
if (searchView.isOpen) {
searchView.closeSearch()
} else {
super.onBackPressed()
}
}
}
ここまで実装が終えたら動かしてみると、検索結果は何も表示されず
検索窓だけある画面が表示されます。✨

🔗 関連リンク
2018年10月4日木曜日
Google I/O 2018:Android の新機能のAndroid App Bundle を少しだけ触る
Android App Bundle
- 新しい公開フォーマット
- アプリのサイズが劇的に削減される
- ユーザーがアプリをダウンロードするときにユーザーの端末に一致する コードとリソースのみが配信される
手順
https://developer.android.com/studio/projects/dynamic-delivery
基本Android Stduio3.2以上であれば自動でAndroid App Bundleが適用されていそう。
- 複数APK作成しなくてもよくなった
- Build multiple APKs
- バージョンコードは1箇所で管理できる
- Dynamic feature modules
- 特定のフィーチャとリソースをアプリの基本モジュールから分離して、アプリバンドルに含めることができる
Dynamic feature modules
試しに作成してみる
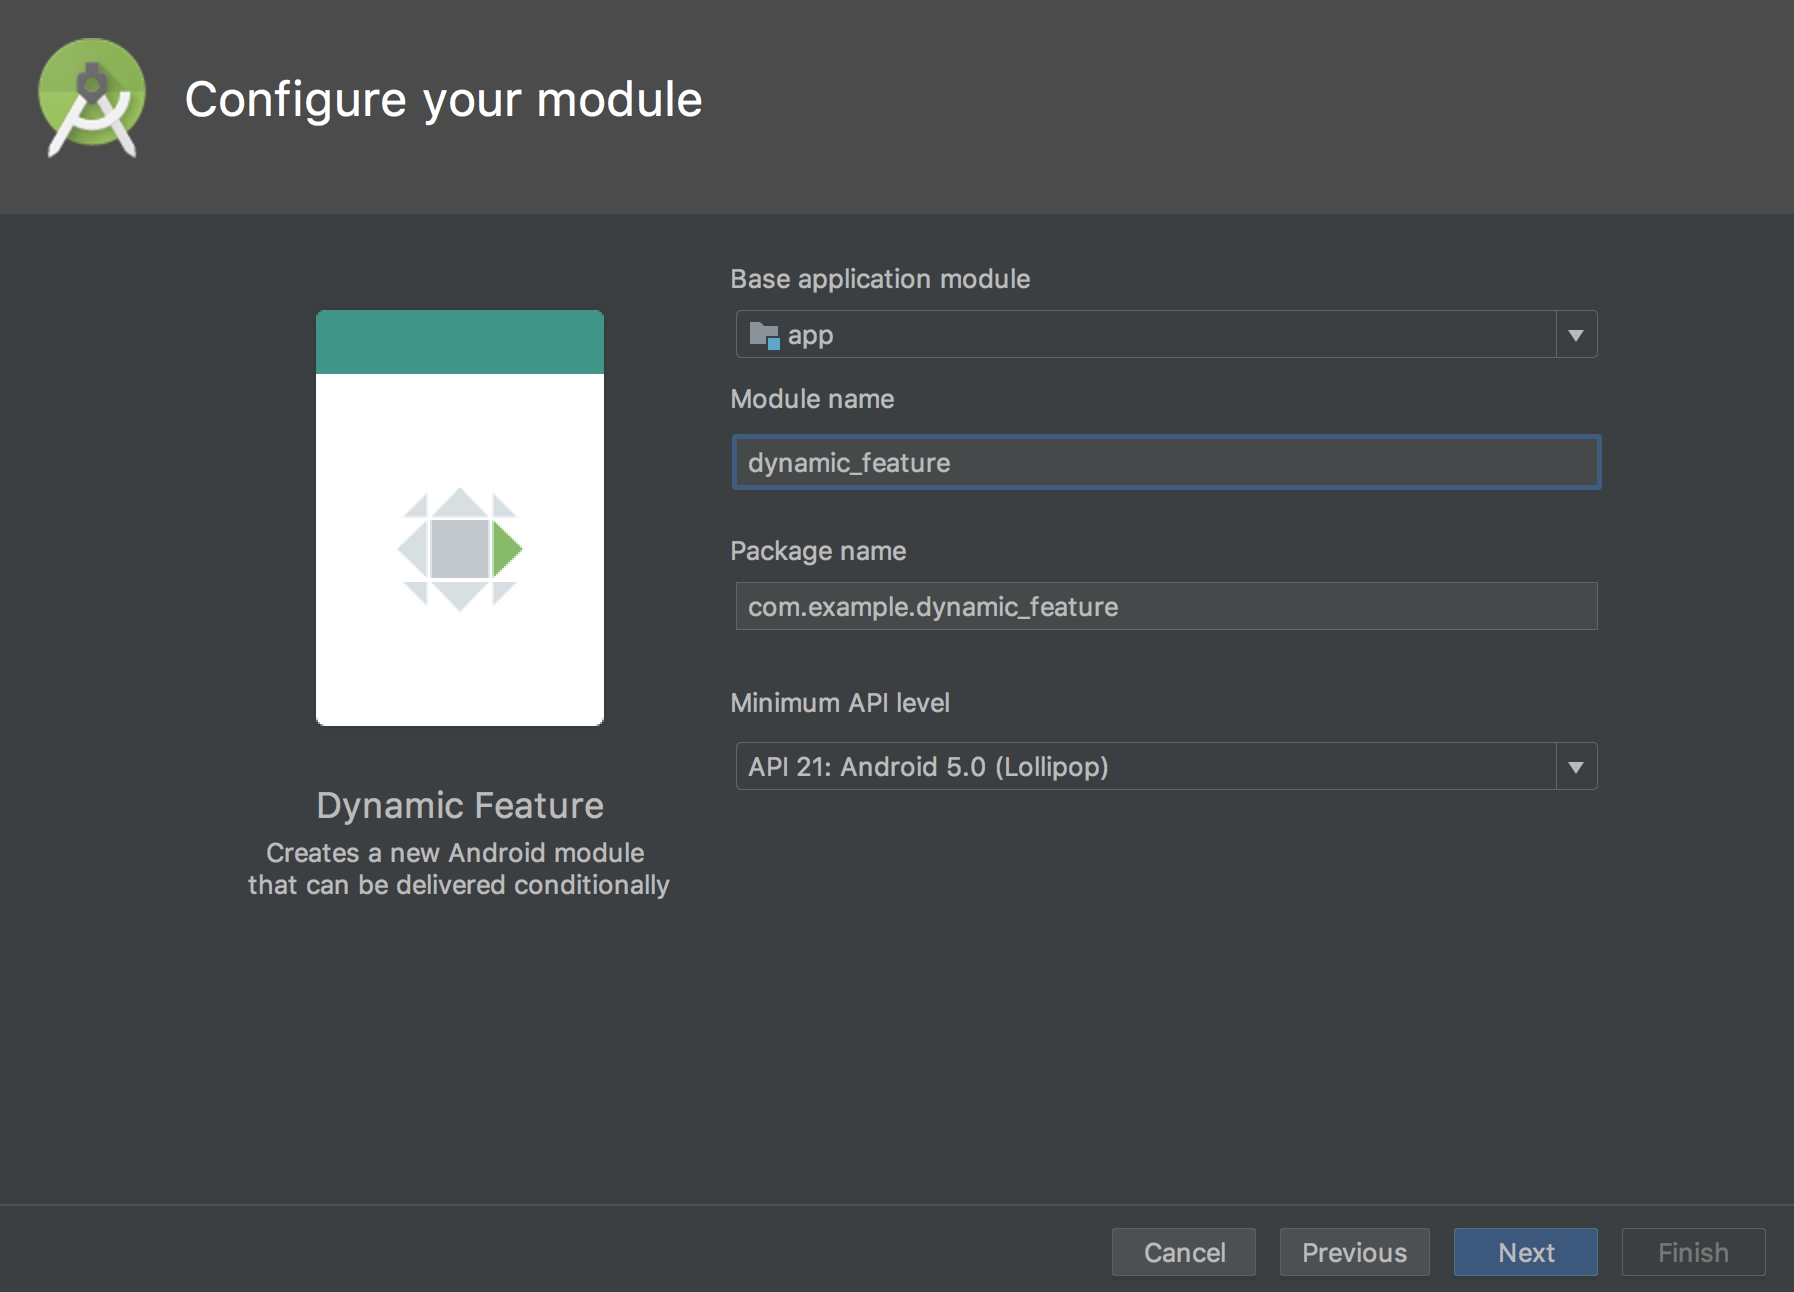
Android Studio 3.2で適当にプロジェクトを作成し、「File」>「New」>「New Module」で
「Dynamic Feature Module」を選択

Android Studio 3.2で適当にプロジェクトを作成し、「File」>「New」>「New Module」で
「Dynamic Feature Module」を選択
↑ユーザーが見るモジュール名を設定
app/build.gradleに以下が追加されるdynamicFeatures = [":dynamic_feature"]
- 作成されたdynamic feature moduleのbuild.gradle
gradle
apply plugin: 'com.android.dynamic-feature'
android {
compileSdkVersion 27
defaultConfig {
minSdkVersion 21
targetSdkVersion 27
versionCode 1
versionName "1.0"
}
}
dependencies {
implementation fileTree(dir: 'libs', include: ['*.jar'])
implementation project(':app')
}
- 作成されたdynamic feature moduleのAndroidManifest.xml
xml
<manifest xmlns:android="http://schemas.android.com/apk/res/android"
xmlns:dist="http://schemas.android.com/apk/distribution"
package="com.example.dynamic_feature">
<dist:module
dist:onDemand="true"
dist:title="@string/title_dynamic_feature">
<dist:fusing dist:include="true" />
</dist:module>
</manifest>

テストする際にdynamic feature moduleを含めるかは Run/Debug Configurationdsで設定できる
参考
2018年9月24日月曜日
GASをclasp+typescriptで実装してみる
概要
- claspがtypescriptサポートした 🎉
- 筆者がエディッタをVSCodeに乗り換えたので試したい!
- claspをもう少し詳しく触ってみる
環境
折角なので一から環境作ってみる
$ node -v
v9.5.0
$ npm i @google/clasp -g
古い環境をいったんログアウト
$ clasp logout
※この時古い
再度ログイン
~/.clasprc.jsonは削除された再度ログイン
$ clasp login
どのアカウントでログインされているか分からない場合、
$ clasp list
で直近5件分のプロジェクトが表示される
簡単なサンプル作成
$ mkdir ts-sample
$ cd ts-sample
$ clasp create ts-sample
※この時Google Apps Script APIが無効になっていると以下エラーが出る。
Error: Permission denied. Enable the Apps Script API:
https://script.google.com/home/usersettings
その後pull
$ clasp pull
必要なパッケージをインストール
$ yarn add typescript @types/google-apps-script
$ yarn add tslint --dev
$ ./node_modules/.bin/tslint --init
.clasp.jsonにrootDirを追加
josn
{
"scriptId":"xxxxxxxxxxxxxxxxxxxxxxxxxxxxxxx",
"rootDir": "src"
}
シンプルにアラートが表示される
push
以下のコマンドでjsへトランスパイルしpushしてくれます。便利!
$ clasp push
エラー
2018年7月25日水曜日
CircleCI2.0上でDockerHubへPushする
概要
- Docker Buildを行う
- Serverspecでテストを行う
- Docker HubへPushを行う
環境
↓環境毎のディレクトリにDockerfileとspec用のディレクトリがある
.
├── android
│ └── spec
├── gcc_cmake
│ └── spec
├── rails
│ └── spec
...
├── specfiles #spec用の共通して使用するファイル
│ └── spec
テストを行う場合、各環境のDocker Imageをビルドし、それぞれのテストをServerspecで行う。
Dockerfile
version: 2
jobs:
build:
working_directory: ~/workspace
branches:
only:
- develop
docker:
- image: circleci/ruby:2.4
steps:
- checkout
- setup_remote_docker
# Download and cache dependencies
- restore_cache:
keys:
- v1-dependencies-{{ checksum "Gemfile.lock" }}
- v1-dependencies-
# Install dependencies
- run:
name: bundle install
command: bundle install --path vendor/bundle
- save_cache:
paths:
- vendor/bundle
key: v1-dependencies-{{ checksum "Gemfile.lock" }}
# Test
- run:
name: run test
command: ./run-tests.sh
# Deploy
- run:
name: deploy docker images
command: ./deploy.sh
- ポイント
setup_remote_dockerを設定- dockerやdocker-composeコマンドが使えるようになる
- 詳しくはこちら
- gemに関してはキャッシュしてます
テスト
run-tests.sh
#!/usr/bin/env bash
WORKDIR=$PWD
# Find target directory.
for entity in `find . -type d -mindepth 1 -maxdepth 1 -not -name ".git"`; do
if [ $entity = "./specfiles" ]; then
# Ignore directory
continue
fi
# Only exist spec directory.
if [ -e $entity/spec ]; then
# Copy specfiles.
cp $WORKDIR/specfiles/.rspec $entity/.
cp -r $WORKDIR/specfiles/spec $entity/.
# Build docker image.
cd $entity
./docker-build.sh
cd $WORKDIR
# Exec rspec
bundle exec rspec --default-path $entity/spec
fi
done
対象となるディレクトリ配下に
Docker Imageをビルドし、テストを行なっています。
spec ディレクトリがある環境だけDocker Imageをビルドし、テストを行なっています。
sh
cp $WORKDIR/specfiles/.rspec $entity/.
cp -r $WORKDIR/specfiles/spec $entity/.
↑は共通して使用するテスト用のファイルを各環境へコピーしてます。
Docker Hub へ Push
deploy.sh
#!/usr/bin/env bash
docker login -u $DOCKER_USER -p $DOCKER_PASS
# Android
docker push slowhand/android:1.0
# Rails
docker push slowhand/rails:1.0
# gcc + cmake
docker push slowhand/gcc_cmake:1.0
こちらは単純にloginしてpushしているだけです。
$DOCKER_USER などの環境変数はCircleCI上で定義してます。dockerfiles
2018年7月5日木曜日
Firebaseのfuncsionsを色々試す
Cloud Funcsions
環境構築
事前に
firebase-toolsをインストール
sh
$ npm install -g firebase-tools
firebaseにログイン
sh
$ firebase login
※ 複数のアカウントを使用している場合
~/.config/configstore/ここに- firebase-tools.json
- update-notifier-firebase-tools.json
がアカウント毎に作成されるので、アカウント切り替える場合は
このファイルを一旦削除なりして
このファイルを一旦削除なりして
firebase login すると新しいのが作成される。
functionsプロジェクトの作成
sh
$ firebase init functions
You're about to initialize a Firebase project in this directory:
/xxxxxxx/xxxxxx/xxxxx
=== Project Setup
First, let's associate this project directory with a Firebase project.
You can create multiple project aliases by running firebase use --add,
but for now we'll just set up a default project.
? Select a default Firebase project for this directory: xxxxxx (xxxxxxxx)
=== Functions Setup
A functions directory will be created in your project with a Node.js
package pre-configured. Functions can be deployed with firebase deploy.
✔ Wrote functions/package.json
✔ Wrote functions/index.js
? Do you want to install dependencies with npm now? Yes
複数プロジェクトがあった場合プロジェクトの選択と
依存パッケージのインストールをついでにやってくれるので
インストールしたい場合はここでインストールする。
依存パッケージのインストールをついでにやってくれるので
インストールしたい場合はここでインストールする。
実装
簡単なサンプル
とりあえず
コメントされているのでコメントアウトする。
Hello worldやってみる。firebase init functionsで作成されたfunctions/index.js に実装されてコメントされているのでコメントアウトする。
javascript
exports.helloWorld = functions.https.onRequest((request, response) => {
response.send("Hello from Firebase!");
});
デプロイ
sh
$ firebase deploy --only functions
firebase consoleから
Functionsを選択すると先ほどデプロイされたHello worldがデプロイされていればOK!
URLを叩けば
Hello from Firebase!が表示されるはず。ローカルでの動作確認方法
firebase serve を使う
例)
js
exports.hello = functions.https.onRequest((request, response) => {
response.status(200).send('hogehoge!');
});
functionsディレクトリ直下で firebase serve --only functions コマンドを実行したいけど、プロジェクト直下で実行しないと設定ファイルとかが読み込めなくてエラーになるorz
なので、プロジェクト直下で実行する場合は
$ npm --prefix functions run serve
とすると
functions ディレクトリの package.json の scripts の serve を実行してくれる
functions/package.json
"main": "lib/index.js",
"scripts": {
"serve": "firebase serve --only functions",
"shell": "firebase experimental:functions:shell",
"build": "./node_modules/.bin/tsc"
},
↑
トランスパイラ先のjsを指定できる
Typescript などを使っている場合は "main": "lib/index.js", とする事でトランスパイラ先のjsを指定できる
そしていざ実行すると
i functions: Preparing to emulate functions.
✔ functions: sampleHandler: http://localhost:5000/xxxxxxx/us-central1/sampleHandler
こんな感じでurlが表示されるので叩いてやればOK
バッドノウハウ
firebase serve --only functionsコマンドを実行するとエラー1
Error: No project active, but project aliases are available.
Run firebase use <alias> with one of these options:
xxxxx (xxxxxx)
xxxxx (xxxxxx)
active projectを設定してやる
sh
$ firebase use <project>
↑のコマンドを実行すると、
~/.config/configstore/firebase-tools.json の activeProjects にパスが設定される!firebase serve --only functionsコマンドを実行するとエラー2
⚠ functions: Cannot start emulator. Error: Cannot find module '@google-cloud/functions-emulator/src/config'
(node:49529) UnhandledPromiseRejectionWarning: Unhandled promise rejection (rejection id: 2): TypeError: Cannot read property 'exit' of undefined
自分の場合はnodeのversionが古かった見たく、6.11.5以上にしたらOKだった

登録:
投稿 (Atom)