ページ

ラベル firebase の投稿を表示しています。 すべての投稿を表示

2018年7月5日木曜日

Firebaseのfuncsionsを色々試す

Cloud Funcsions

:computer:環境構築


事前にfirebase-toolsをインストール
sh
$ npm install -g firebase-tools
firebaseにログイン
sh
$ firebase login
※ 複数のアカウントを使用している場合
~/.config/configstore/ここに
  • firebase-tools.json
  • update-notifier-firebase-tools.json
がアカウント毎に作成されるので、アカウント切り替える場合は
このファイルを一旦削除なりして firebase login すると新しいのが作成される。
functionsプロジェクトの作成
sh
$ firebase init functions

                      
                                               
                      
                                               
                               

You're about to initialize a Firebase project in this directory:

  /xxxxxxx/xxxxxx/xxxxx


=== Project Setup

First, let's associate this project directory with a Firebase project.
You can create multiple project aliases by running firebase use --add, 
but for now we'll just set up a default project.

? Select a default Firebase project for this directory: xxxxxx (xxxxxxxx)

=== Functions Setup

A functions directory will be created in your project with a Node.js
package pre-configured. Functions can be deployed with firebase deploy.

✔  Wrote functions/package.json
✔  Wrote functions/index.js
? Do you want to install dependencies with npm now? Yes
複数プロジェクトがあった場合プロジェクトの選択と
依存パッケージのインストールをついでにやってくれるので
インストールしたい場合はここでインストールする。

:pencil: 実装


簡単なサンプル

とりあえずHello worldやってみる。
firebase init functionsで作成されたfunctions/index.js に実装されて
コメントされているのでコメントアウトする。
javascript
exports.helloWorld = functions.https.onRequest((request, response) => {
 response.send("Hello from Firebase!");
});
デプロイ
sh
$ firebase deploy --only functions
firebase consoleからFunctionsを選択すると先ほどデプロイされたHello worldがデプロイされていればOK!
スクリーンショット 2017-07-09 17.24.19.png (74.9 kB)
URLを叩けばHello from Firebase!が表示されるはず。

ローカルでの動作確認方法

firebase serve を使う

例)
js
exports.hello = functions.https.onRequest((request, response) => {
  response.status(200).send('hogehoge!');
});
functionsディレクトリ直下で firebase serve --only functions コマンドを実行したいけど、
プロジェクト直下で実行しないと設定ファイルとかが読み込めなくてエラーになるorz
なので、プロジェクト直下で実行する場合は
$ npm --prefix functions run serve 
とすると functions ディレクトリの package.json の scripts の serve を実行してくれる
functions/package.json
  "main": "lib/index.js",
  "scripts": {
    "serve": "firebase serve --only functions",
    "shell": "firebase experimental:functions:shell",
    "build": "./node_modules/.bin/tsc"
  },
↑ Typescript などを使っている場合は "main": "lib/index.js", とする事で
トランスパイラ先のjsを指定できる
そしていざ実行すると
i  functions: Preparing to emulate functions.
✔  functions: sampleHandler: http://localhost:5000/xxxxxxx/us-central1/sampleHandler
こんな感じでurlが表示されるので叩いてやればOK

:bomb: バッドノウハウ


  • firebase serve --only functions コマンドを実行するとエラー1
Error: No project active, but project aliases are available.

Run firebase use <alias> with one of these options:

  xxxxx (xxxxxx)
  xxxxx (xxxxxx)
active projectを設定してやる
sh
$ firebase use <project>
↑のコマンドを実行すると、~/.config/configstore/firebase-tools.json の activeProjects にパスが設定される!
  • firebase serve --only functions コマンドを実行するとエラー2
⚠  functions: Cannot start emulator. Error: Cannot find module '@google-cloud/functions-emulator/src/config'
(node:49529) UnhandledPromiseRejectionWarning: Unhandled promise rejection (rejection id: 2): TypeError: Cannot read property 'exit' of undefined
同じようなissueが上がっていた:eyes:
https://github.com/firebase/firebase-tools/issues/552
自分の場合はnodeのversionが古かった見たく、6.11.5以上にしたらOKだった:+1:

2018年3月21日水曜日

重い腰を上げてCloud Firestoreを触ってみた

Cloud Firestore

:computer:環境構築


とりあえずSampleプロジェクトを立てて、Cloud Firestoreを使って見る
image.png (17.1 kB)
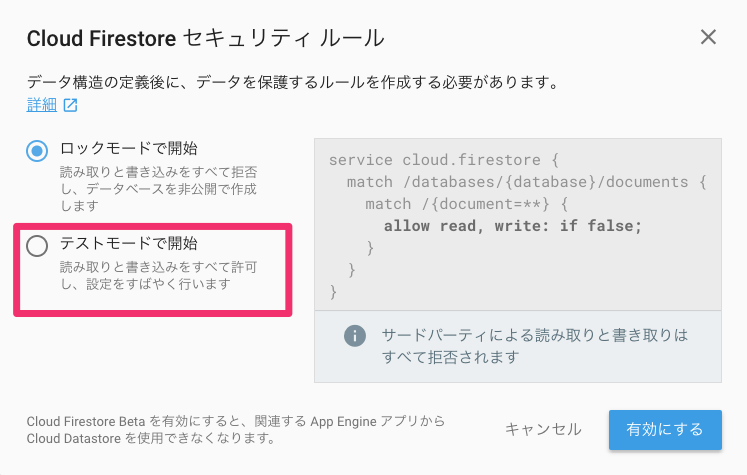
セキュリティルール
image.png (76.8 kB)
とりあえず「テストモード」で開始する

セキュリティルール

  • テストモードで作られたrules
    service cloud.firestore {
      match /databases/{database}/documents {
            match /{document=**} {
              allow read, write;
            }
      }
    }
    
  • ログインしているユーザー全員にデータを読ませる場合
    service cloud.firestore {
      match /databases/{database}/documents {
            match /{document=**}{
                allow read, write:if request.auth != null;
            }
      }
    }
    

コレクション/ドキュメント

  • コレクション
    • ドキュメントを含んだ単なるコンテナ
  • ドキュメント
    • フィールド(例、名字、名前、年齢、性別、、、)を含んだ一意の名前のレコード

:pencil: 実装


簡単なサンプル

まずは試せる最小の構成を作成
html
<!DOCTYPE html>
<html lang="ja">
  <head>
    <meta charset="utf-8">
    <meta name="viewport" content="width=device-width, initial-scale=1,user-scalable=no">
    <title>Google Firestore Sample</title>
  </head>
  <body>
    <div class="container"></div>

    <script src="https://cdnjs.cloudflare.com/ajax/libs/jquery/3.0.0-alpha1/jquery.min.js"></script>
    <script src="https://www.gstatic.com/firebasejs/4.10.1/firebase.js"></script>
    <script src="https://www.gstatic.com/firebasejs/4.10.1/firebase-firestore.js"></script>
    <script>
      // Initialize Firebase
      var config = {
        apiKey: "XXXXXXXXXXXXXXXXXXXXXXXXXX,
        authDomain: "xxxxxx.firebaseapp.com",
        databaseURL: "https://xxxxxx.firebaseio.com",
        projectId: "xxxxxxx",
        storageBucket: "xxxxxx.appspot.com",
        messagingSenderId: "xxxxxxxxxxxx"
      };
      firebase.initializeApp(config);
    </script>
  </body>
</html>
configの所は適時置き換え

データの読み込み

特定のパスを直接指定して値を読み込んで見たいと思います。
html
    <div class="container">
      <p class="text"></p>
    </div>
jsの部分 (今回は誰でも触れるrulesでやってます)
js
      const db = firebase.firestore();
      // データ読み込み
      const ref = db.doc('/xxxxx/xxxxxx');
      ref.get().then((doc) => {
        if (doc && doc.exists) {
          console.log(doc.data());
          $('.container .text').text(doc.data().value);
        }
      }).catch((error) => console.error(error));

データの書き込み

js
      // データの書き込み
      $('.container > .form > .send').click(() => {
        ref.set({
          name: $('.container > .form > .name').val()
        }).then(() => {
          console.log('write success!');
        }).catch((error) => console.error(error))
      });
※ updateと違ってドキュメント全てを置き換えるので注意!

データの監視

js
      // データの監視
      ref.onSnapshot({includeMetadataChanges: true}, (doc) => {
        if (doc && doc.exists) {
          $('.container .text').text(doc.data().name);
        }
      });

2018年2月25日日曜日

FIrebase+Admobをアプリに組み込む

Firebase + Admob

公式ページ (Admon)
FirebaseのアナリティクスとAdmonを連携させてより広告効果を上げれるとの事なのでやって見る。

:computer:環境構築


まずはAdmobに登録する
image.png (386.7 kB)Admobに申し込むにはAdSenseとAdWordsのアカウントが必要らしい。
https://apps.admob.com/ から申し込む
スクリーンショット 2017-12-09 16.27.55.png (77.2 kB)
アプリを登録から諸々設定し、ホーム画面へ
設定中に表示されたアプリIDはメモしておく
スクリーンショット 2017-12-09 16.29.25.png (352.9 kB)

:pencil: アプリに組み込み


事前準備

  1. Firebase SDK をインストールします。
  2. AdMob アカウントを開設し、アプリを登録します。
  3. アプリを Firebase プロジェクトにリンクします。

Android側の設定

build.gradleでSDKをインストール
compile 'com.google.firebase:firebase-ads:11.4.0'
SDKの初期化
ApplicationクラスのonCreateに以下を追加
java
MobileAds.initialize(this, getString(R.string.admob_app_id));
R.string.admob_app_idstring.xmlでアプリIDを設定

バナー表示


今回はバナー広告を表示させてみる
メインのlayoutにAdViewを追加
xml
<RelativeLayout
        ...
        <com.google.android.gms.ads.AdView
            xmlns:ads="http://schemas.android.com/apk/res-auto"
            android:id="@+id/adView"
            android:layout_width="wrap_content"
            android:layout_height="wrap_content"
            android:layout_centerHorizontal="true"
            android:layout_alignParentBottom="true"
            ads:adSize="BANNER"
            ads:adUnitId="@string/admob_unit_id" />
</RelativeLayout>
@string/admob_unit_idにはテスト用のIDを設定済み
表示させるActivityのonCreateで以下実装を追加
java
       // Admob
        AdRequest adRequest = new AdRequest.Builder().build();
        mBinding.adView.loadAd(adRequest);


実機でテストAdを表示させる場合

テスト用unit idを設定し一度実機で実行させるとログキャットに
I/Ads: Use AdRequest.Builder.addTestDevice("XXXXXXXXXXXXXXXXXXXXXXXXXXXXXXXX")
to get test ads on this device.
のようなテストDevicesのIDがログに表示されるのでメインアクティビティの設定を
java
AdRequest request = new AdRequest.Builder()
    .addTestDevice("XXXXXXXXXXXXXXXXXXXXXXXXXXXXXXXX")
    .build();