ページ

2016年5月28日土曜日

HTML5のCanvasでimgとcanvasを重ねて拡大鏡を作る


最近、HTML5のCanvas上で拡大鏡を作ることがあったのでそのメモです。

完成イメージ


まずは、完成イメージ↓
gif
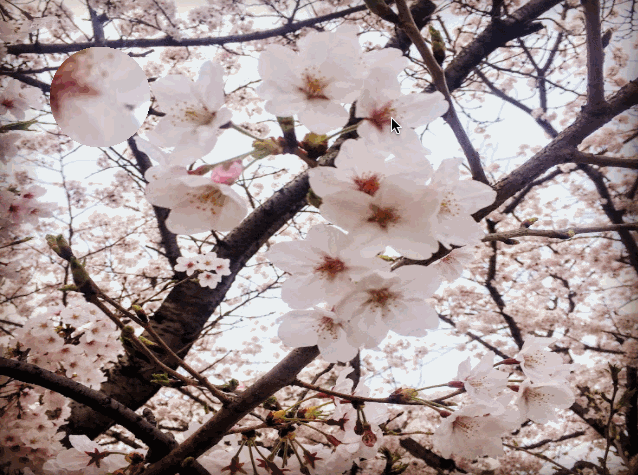
マウスの動きに合わせて拡大鏡が動きます。

実装


土台となるhtmlですが、imgの上にcanvasのレイヤーを重ねてます。
重ねる為imgにはz-index: 1;canvasにはz-index: 2;を指定し、
Z方向の位置を設定しています。
  • index.html
<!DOCTYPE html>
<html>
<head>
  <meta charset="utf-8">
  <title>loupe</title>
  <script type="text/javascript" src="canvas_loupe.js"></script>
  <script type="text/javascript" src="index.js"></script>
  <style>
    #container {
      position: relative;
    }
    #main_img {
      width: 640px;
      height: 480px;
      position: absolute;
      z-index: 1;
    }
    #loupe_canvas {
      position: absolute;
      z-index: 2;
    }
  </style>
</head>
<body>
  <div id="container">
    <img id="main_img" src="sample.jpg"></img>
    <canvas id="loupe_canvas" width="640" height="480"></canvas>
  </div>
</body>
</html>
次に実際の拡大鏡の処理を行うcanvas_loupe.jsです。
  • canvas_loupe.js
/**
 * canvas_loupe.js
 */

var loupe = {

  x: 0, // Current x.
  y: 0, // Current y.
  w: 0, // Image width.
  h: 0, // Image height.
  loupe_x: 50, // loupe x coordinate.
  loupe_y: 50, // loupe y coordinate.
  size: 50, // Crop size.
  zoom: 2, // Zoom rate.
  wide_size: 0, // Crop size * Zoom rate.
  image: null, // Image object.
  /**
   * Initialize.
   *
   * @param w Image width
   * @param h Image height
   * @param src Image src
   */
  initialize: function(w, h, src) {
    this.w = w;
    this.h = h;
    this.wide_size = this.size * this.zoom;
    this.image = new Image();
    this.image.src = src;
  },
  /**
   * Update coordinate.
   *
   * @param x
   * @param y
   */
  update: function(x, y) {
    this.x = x;
    this.y = y;
  },
  /**
   * Draw loupe.
   *
   * @param ctx context
   */
  draw: function(ctx) {

    var nx = (this.x * this.image.naturalWidth / this.w) - (this.size / 2);
    var ny = (this.y * this.image.naturalHeight / this.h) - (this.size / 2);

    ctx.save();
    ctx.beginPath();
    ctx.arc(this.loupe_x + this.wide_size / 2,
      this.loupe_y + this.wide_size / 2, this.wide_size / 2, 0, Math.PI * 2, false);
    ctx.clip();

    ctx.drawImage(this.image, nx, ny, this.size, this.size,
      this.loupe_x, this.loupe_y, this.wide_size, this.wide_size);
    ctx.restore();
  }
};
やってる事としては、、
  • initialize
    画像のsrcと画像の幅、高さを引数で渡して、メンバに保存してます
  • update
    x,yの座標位置(マウスの位置)を更新しています。
  • draw
    描画を行っている箇所です。まず
    var nx = (this.x * this.image.naturalWidth / this.w) - (this.size / 2);
    var ny = (this.y * this.image.naturalHeight / this.h) - (this.size / 2);
    ↑で実際の画像サイズと表示サイズを元に拡大鏡の描画位置を算出しています。
    次にclipを使って拡大鏡の丸い形でくり抜く処理を行ってます
    ctx.beginPath();
    ctx.arc(this.loupe_x + this.wide_size / 2,
      this.loupe_y + this.wide_size / 2, this.wide_size / 2, 0, Math.PI * 2, false);
    ctx.clip();
    最後に拡大した画像を表示させています。
    ctx.drawImage(this.image, nx, ny, this.size, this.size,
      this.loupe_x, this.loupe_y, this.wide_size, this.wide_size);
    先にくり抜く形を指定しclipしてからdrawImageすると指定した
    形で画像がくり抜かれて描画されます。
最後に拡大鏡の呼び出しやマウス位置更新の処理を行っているindex.jsです。
  • index.js
var ctx = null;

window.onload = function() {
  var canvas = document.getElementById('loupe_canvas');
  ctx = canvas.getContext('2d');

  canvas.addEventListener('mousemove', onMouseMove);
  loupe.initialize(640, 480, 'sample.jpg');

};

function onMouseMove(e) {
  loupe.update(e.clientX, e.clientY);
  loupe.draw(ctx);
}
マウス移動時onMouseMoveloupeを呼び出しています。

2016年5月25日水曜日

機械学習のフレームワークTensorflowを試す3 - サンプルコードを紐解く -


前回まで環境設定と動かすまでやったので、今回から簡単なサンプルで
色々学習していきたいと思います。

サンプルコード

公式ページのIntroductionに掲載されているコードです。
import tensorflow as tf
import numpy as np

# Create 100 phony x, y data points in NumPy, y = x * 0.1 + 0.3
x_data = np.random.rand(100).astype(np.float32)
y_data = x_data * 0.1 + 0.3

# Try to find values for W and b that compute y_data = W * x_data + b
# (We know that W should be 0.1 and b 0.3, but Tensorflow will
# figure that out for us.)
W = tf.Variable(tf.random_uniform([1], -1.0, 1.0))
b = tf.Variable(tf.zeros([1]))
y = W * x_data + b

# Minimize the mean squared errors.
loss = tf.reduce_mean(tf.square(y - y_data))
optimizer = tf.train.GradientDescentOptimizer(0.5)
train = optimizer.minimize(loss)

# Before starting, initialize the variables.  We will 'run' this first.
init = tf.initialize_all_variables()

# Launch the graph.
sess = tf.Session()
sess.run(init)

# Fit the line.
for step in xrange(201):
    sess.run(train)
    if step % 20 == 0:
        print(step, sess.run(W), sess.run(b))

# Learns best fit is W: [0.1], b: [0.3]
y = x * 0.1 + 0.3の数式の内、0.10.3を隠してTensorflowに
導きだしてもらうサンプルです。

事前準備

まず、最初にxの値をランダムに100個作成し
x_data = np.random.rand(100).astype(np.float32)
その値を元に数式を計算しy_dataに格納します。
y_data = x_data * 0.1 + 0.3
この時点でy_dataには100個ランダムな値が格納されています。
次の
W = tf.Variable(tf.random_uniform([1], -1.0, 1.0))
b = tf.Variable(tf.zeros([1]))
y = W * x_data + b
ですが、Variableはメモリにテンソルをバッファします。
テンソルとは・・?
学習処理で扱われるデータ構造。n次元の配列。
tf.random_uniform([1], -1.0, 1.0)では一次元の配列の要素1つ[1]
-1.0から1.0までの間のランダムなテンソルを返します。
tf.zeros([1])では一次元の配列の要素1つに0を設定したテンソルを返します。
次に
loss = tf.reduce_mean(tf.square(y - y_data))
optimizer = tf.train.GradientDescentOptimizer(0.5)
train = optimizer.minimize(loss)
では、tf.square(y - y_data)y - y_dataの2乗した値が設定されたテンソル(1次元で100個の要素)をtf.reduce_meanで平均値を算出しています。 つまり元の正解の値(0.1と0.3)で計算したy_dataとランダムな値で
計算したyとを比較し間違いの度合いを算出しています。
tf.train.GradientDescentOptimizer最急降下法のアルゴリズムを
使用し間違い度合いが少なくなるように設定します。
この方法を最小二乗法というらしいです。。
ちなみに何故二乗するかは、誤差がマイナスでもプラスでも二乗する事で全てプラスになります。

学習の実行

最後に
init = tf.initialize_all_variables()

# Launch the graph.
sess = tf.Session()
sess.run(init)

# Fit the line.
for step in xrange(201):
    sess.run(train)
    if step % 20 == 0:
        print(step, sess.run(W), sess.run(b))
学習を実行させ、適当なステップ毎に値を表示させています。
実行する度に表示される値は異なりますが、だいたい0.10.3に近づいているかと思います。

2016年5月21日土曜日

機械学習のフレームワークTensorflowを試す2 - 簡単なデモを試す -


前回は環境構築を行いましたが、今回は簡単なデモを実行してみたいと思います。
MNISTデータセットを使ったデモ

早速Virtualenvの環境に切り替えます。
$ source <特定のディレクトリ>/bin/activate
シンプルなデモが既にインストールされているのでそれを実行します。
ちなみにTensorflowがどこにインストールされているかは、
$ python -c 'import os; import inspect; import tensorflow; print(os.path.dirname(inspect.getfile(tensorflow)))'
で見つける事ができます。
手書きのMNISTデータセットを使ったシンプルなデモが上で見つけたパス配下の
models/image/mnist/convolutional.pyにあるのでそれを実行してみます。
MNISTデータセットは↓のようなものです。

いざ実行してみます。
$ python -m tensorflow.models.image.mnist.convolutional
※ python -mを指定するとプログラムを見つけて実行してくれます
実行すると勝手にデータを取得して解析してくれます。
Successfully downloaded train-images-idx3-ubyte.gz 9912422 bytes.
Successfully downloaded train-labels-idx1-ubyte.gz 28881 bytes.
Successfully downloaded t10k-images-idx3-ubyte.gz 1648877 bytes.
Successfully downloaded t10k-labels-idx1-ubyte.gz 4542 bytes.
Extracting data/train-images-idx3-ubyte.gz
Extracting data/train-labels-idx1-ubyte.gz
Extracting data/t10k-images-idx3-ubyte.gz
Extracting data/t10k-labels-idx1-ubyte.gz
Initialized!
Step 0 (epoch 0.00), 6.7 ms
Minibatch loss: 12.054, learning rate: 0.010000
Minibatch error: 90.6%
Validation error: 84.6%
Minibatch loss: 3.269, learning rate: 0.010000
Minibatch error: 6.2%
Validation error: 6.9%
Step 200 (epoch 0.23), 399.2 ms
Minibatch loss: 3.474, learning rate: 0.010000
Minibatch error: 12.5%
Validation error: 3.6%
・・・中略・・・
Step 8500 (epoch 9.89), 357.7 ms
Minibatch loss: 1.614, learning rate: 0.006302
Minibatch error: 3.1%
Validation error: 0.8%
Test error: 0.8%
最初は高かったエラー率が学習の成果で低くなっていってるのが分かるかと思います。
自分の環境では最後にエラーが0.8%までになっています。
とりあえずデモは実行できましたが、イメージがわかない・・ので
もっと色々試してみようかと思います^^;

2016年5月18日水曜日

機械学習のフレームワークTensorflowを試す1 - 環境構築 -


やっと重い腰を上げて機械学習をやってみようかと思います^^;
2015年はよく目にしていた人工知能/機械学習/ディープラーニングですが、
(※以前オススメの書籍でも紹介しましたが、読んで満足してそれっきりです・・)
難しそうなイメージで後回しにしてましたが、何はともあれやってみよう!!と・・
いつものようにトライ&エラーでやってみたいと思います。
まず上で出てきたキーワードですが、違いをはっきり理解する為に調べてみました。
Wikipediaによると・・
  • 人工知能における研究課題の一つで、人間が自然に行っている学習能力と同様の機能をコンピュータで実現しようとする技術・手法のことである。
  • 多層構造のニューラルネットワークの機械学習の事
  • 人工的にコンピュータ上などで人間と同様の知能を実現させようという試み、或いはそのための一連の基礎技術を指す。
となっています。人工知能の中の機械学習という分野があって、機械学習の中にディープラーニングがあるといった事ですね。

Tensorflow

実際に機械学習をやってみるんですが、現在機械学習のフレームワークが複数存在してます。(TensorFlow, Caffe, Chainer・・など)
今回はその中でTensorflowに挑戦してみたいと思います。
Tensorflowとは?
2015年11月にオープン化されたGoogleの機械学習ライブラリ
Googleのサービスでも使われている。
特徴としてはdata flow graphsというものを使って処理され
CPUでもGPUでも走り、PythonやC++でも書ける。

環境構築

MacOS(El Capitan)への環境構築となります。
公式ページの通りに進めていきたいと思います。
  • Pip インストール
    Pythonのパッケージマネージャであるpipをインストールします。
$ sudo easy_install pip
  • Virtualenv インストール
    仮想のPython実行環境を作成してくれるVirtualenvをインストールします。
$ sudo pip install --upgrade virtualenv
  • Virtualenv環境作成
$ virtualenv --system-site-packages <特定のディレクトリ>
$ source <特定のディレクトリ>/bin/activate
  • Tensorflowをインストール
$ pip install --upgrade https://storage.googleapis.com/tensorflow/mac/tensorflow-0.8.0-py2-none-any.whl
テスト

それではちゃんと環境構築されたかテストしてみたいと思います。
pythonコマンドを実行しインタラクティブモードで以下を実行します。
$ python
>>> import tensorflow as tf
>>> hello = tf.constant('Hello, TensorFlow!')
>>> sess = tf.Session()
>>> print(sess.run(hello))
Hello, TensorFlow!
>>> a = tf.constant(10)
>>> b = tf.constant(32)
>>> print(sess.run(a + b))
42
>>> exit()
上の様に表示されればOKです。