たくさん買ってみた^^
一番右のだけスーパーで購入。
他は楽天ポイントで購入。今の所リッチブレンドが一番美味しい^^
2014年11月30日日曜日
Dockerをさわってみる 3 - Dockerfile -
Dockerfileで環境作り
前回から少ししか経ってないのにもうDocker1.1が出たらしい。。早っ><;今回はDockerfileを使って環境を作成してみる。
Dockerfileとは
MakefileのDocker版。#がコメント。{命令}と{引数}でスペース区切りで記述。
「docker build」する事でDockerfileの上から順に実行される。
※主な命令
| {命令} | 用途 |
|---|---|
| FROM | 元となるDockerイメージの指定 |
| MAINTAINER | 作成者の情報 |
| RUN | コマンドの実行 |
| ADD | ファイル/ディレクトリの追加 |
| CMD | コンテナーの実行コマンド 1 |
| ENTRYPOINT | コンテナーの実行コマンド 2 |
| WORKDIR | 作業ディレクトリの指定 |
| ENV | 環境変数の指定 |
| USER | 実行ユーザーの指定 |
| EXPOSE | ポートのエクスポート |
| VOLUME | ボリュームのマウント |
試しに、前回同様nginxをインストール + index.htmlを追加するDockerfileを作成してみる。
[root@localhost docker]# mkdir nginx1
[root@localhost docker]# cd nginx1/
[root@localhost nginx1]# ls
[root@localhost nginx1]# vi Dockerfile
[root@localhost nginx1]# ls
Dockerfile
[root@localhost nginx1]# echo 'hello docker' > index.html
[root@localhost nginx1]# ls
Dockerfile index.html
[root@localhost nginx1]#
いざ、build!!
[root@localhost nginx1]# docker build -t fuji/nginx:1.0 .
Sending build context to Docker daemon 3.584 kB
Sending build context to Docker daemon
Step 0 : FROM ubuntu
---> 1357f421be38
Step 1 : MAINTAINER XXXXXX <xxxx@gmail.com>
---> Running in e779846d56f3
---> 86560b5fee44
Removing intermediate container e779846d56f3
Step 2 : RUN apt-get update
---> Running in a3a46568fd97
Ign http://archive.ubuntu.com trusty InRelease
Ign http://archive.ubuntu.com trusty-updates InRelease
Ign http://archive.ubuntu.com trusty-security InRelease
Ign http://archive.ubuntu.com trusty-proposed InRelease
ん〜、ビルドは最後までいったっぽいが、image名が空?
[root@localhost nginx1]# docker images
REPOSITORY TAG IMAGE ID CREATED VIRTUAL SIZE
<none> <none> 164fa62b79b6 42 seconds ago 231.5 MB
fuji/nginx latest fd64b49b28ca 7 weeks ago 231.2 MB
ubuntu 14.10 b8d67033ed07 7 weeks ago 242.4 MB
ubuntu utopic b8d67033ed07 7 weeks ago 242.4 MB
ubuntu 14.04 1357f421be38 7 weeks ago 192.7 MB
ubuntu 14.04.1 1357f421be38 7 weeks ago 192.7 MB
ubuntu trusty 1357f421be38 7 weeks ago 192.7 MB
ubuntu latest 1357f421be38 7 weeks ago 192.7 MB
ubuntu 12.04 2bed76595591 7 weeks ago 114.6 MB
ubuntu 12.04.5 2bed76595591 7 weeks ago 114.6 MB
ubuntu precise 2bed76595591 7 weeks ago 114.6 MB
一旦、IMAGE IDを指定してコンテナ作成&実行してみる。
[root@localhost nginx1]# docker run -d -p 80:80 --name nginx1 164fa62b79b6 /usr/sbin/nginx -g 'daemon off;' -c /etc/nginx/nginx.conf
44756c2137b2a1fdcf0b3dd06b7a8bb9b4a5b0a41f803cc8da03a5dc6e2d61ac
[root@localhost nginx1]# docker ps
CONTAINER ID IMAGE COMMAND CREATED STATUS PORTS NAMES
44756c2137b2 164fa62b79b6 /usr/sbin/nginx -g ' 19 seconds ago Up 18 seconds 0.0.0.0:80->80/tcp nginx1
[root@localhost nginx1]# curl localhost:80
<!DOCTYPE html>
<html>
<head>
<title>Welcome to nginx!</title>
<style>
body {
width: 35em;
margin: 0 auto;
font-family: Tahoma, Verdana, Arial, sans-serif;
}
</style>
</head>
<body>
<h1>Welcome to nginx!</h1>
<p>If you see this page, the nginx web server is successfully installed and
working. Further configuration is required.</p>
<p>For online documentation and support please refer to
<a href="http://nginx.org/">nginx.org</a>.<br/>
Commercial support is available at
<a href="http://nginx.com/">nginx.com</a>.</p>
<p><em>Thank you for using nginx.</em></p>
</body>
</html>
[root@localhost nginx1]#
実行はできたが、index.htmlがコピーされていないorz
よくみてみたら、Dockerfileでindex.htmlのコピー先が間違っていたorz
[root@localhost nginx1]# cat Dockerfile
FROM ubuntu
MAINTAINER XXXXXXX <xxxx@gmail.com>
RUN apt-get update
RUN apt-get install -y nginx
ADD index.html /usr/share/nginx/html/
×「/usr/share/nginx/html」⚪︎「/usr/share/nginx/html/」
もう一度ビルドしてみたら、ちゃんとイメージができてるっぽい。
[root@localhost nginx1]# docker images
REPOSITORY TAG IMAGE ID CREATED VIRTUAL SIZE
build_nginx 1.0 aaf400998859 10 seconds ago 231.5 MB
fuji/nginx latest fd64b49b28ca 7 weeks ago 231.2 MB
ubuntu 14.10 b8d67033ed07 7 weeks ago 242.4 MB
ubuntu utopic b8d67033ed07 7 weeks ago 242.4 MB
ubuntu 14.04.1 1357f421be38 7 weeks ago 192.7 MB
ubuntu latest 1357f421be38 7 weeks ago 192.7 MB
ubuntu 14.04 1357f421be38 7 weeks ago 192.7 MB
ubuntu trusty 1357f421be38 7 weeks ago 192.7 MB
ubuntu 12.04 2bed76595591 7 weeks ago 114.6 MB
ubuntu 12.04.5 2bed76595591 7 weeks ago 114.6 MB
ubuntu precise 2bed76595591 7 weeks ago 114.6 MB
起動&確認
[root@localhost nginx1]# docker run -d -p 80:80 --name nginx1 build_nginx:1.0 /usr/sbin/nginx -g 'daemon off;' -c /etc/nginx/nginx.conf
21b37014f9657950c88db17d331d9075d5d8b6a9803b7534303cf32ffc2ee881
[root@localhost nginx1]# docker ps
CONTAINER ID IMAGE COMMAND CREATED STATUS PORTS NAMES
21b37014f965 build_nginx:1.0 /usr/sbin/nginx -g ' 4 seconds ago Up 4 seconds 0.0.0.0:80->80/tcp nginx1
[root@localhost nginx1]# curl localhost:80
hello docker
[root@localhost nginx1]#
ん〜ちゃんとできている^^
参考URL
Seasarしてみるさー 4 - バリデーション -
入力チェックの追加
前回のアクションフォームに入力チェックを追加してみる。まずは、エラーがあった場合のエラー表示。
・input.jsp
<%@ page language="java" contentType="text/html; charset=UTF-8"
pageEncoding="UTF-8"%>
<!DOCTYPE html PUBLIC "-//W3C//DTD HTML 4.01 Transitional//EN" "http://www.w3.org/TR/html4/loose.dtd">
<html>
<head>
<meta http-equiv="Content-Type" content="text/html; charset=UTF-8">
<title>入力画面</title>
</head>
<body>
<h1>入力画面</h1>
<html:errors/>
<s:form>
<html:textarea property="msg" cols="60" />
<s:submit value="保存" property="register" />
</s:form>
</body>
</html>
エラー表示する為の<html:errors/>を追加。
プロパティ毎にも設定できる。ex) <html:errors property=“msg” />
アクションフォームにアノテーションを設定。
public class RegisterForm {
@Required
public String msg;
}
@Requiredアノテーションで入力必須項目となる。
アクション側には@Executeアノテーションでvalidatorをtureにする必要がある。
/**
* 登録処理
*
* @return competeへリダイレクト
*/
@Execute(validator = true, input="input.jsp")
public String register() {
sessionDto.message = registerForm.msg;
return "complete?redirect=true";
}
第二引数はチェックエラー時の遷移先。
↓実行結果
次に独自の検証メソッドでチェックを行ってみる
独自の検証メソッドを使う場合は、アクションの@Executeアノテーションのvalidateに検証メソッドを設定する。
検証メソッドは、アクションフォームに書くのが一般的らしい。
・RegisterForm
public class RegisterForm {
@Required
public String msg;
/**
* 独自のチェックメソッド
* <br>半角or全角のスペースを含んでいたらNG
*
* @return {@link ActionMessages}
*/
public ActionMessages mycheck() {
ActionMessages errors = new ActionMessages();
// メッセージが空白を含んでいたらNG
if (msg.contains(" ")
|| msg.contains(" ")) {
errors.add("msg", new ActionMessage("スペースを含んでいます。", false));
}
return errors;
}
}
・RegisterAction
/**
* 登録処理
*
* @return competeへリダイレクト
*/
@Execute(validate = "mycheck", input="input.jsp")
public String register() {
sessionDto.message = registerForm.msg;
return "complete?redirect=true";
}
↓実行結果
便利^^
2014年11月24日月曜日
CheckStyleを入れてみる
EclipseにはCheckStyleというコーディング規約のチェックをしてくれる便利なプラグインがあるという事なので、インストールしてみる。
Eclipseのhelp > Install new Software を選択、Addを押してリポジトリを追加。
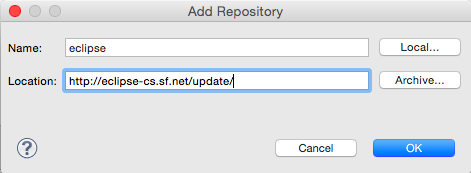
ロケーションは「http://eclipse-cs.sf.net/update/」
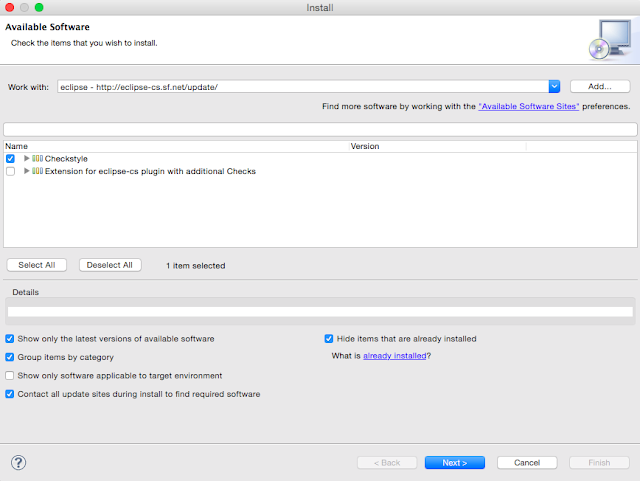
CheckStyleを選択し、インストール。Eclipseが再起動される。
プロジェクト右クリック > プロパティ でCheckStyleが追加されている。
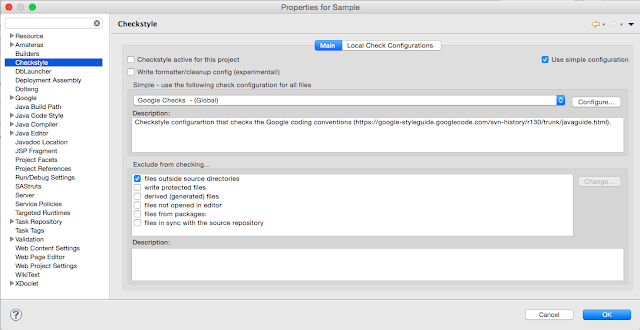
ここに、試しにAndroid用のチェックスタイルを適用させてみる。
有志が作成したAndroid CheckStyle
https://gist.github.com/shareme/4197561#file-eclipse_checkstyle560_android-xml-L7
Local Check Configurationsタブから、newを押す。
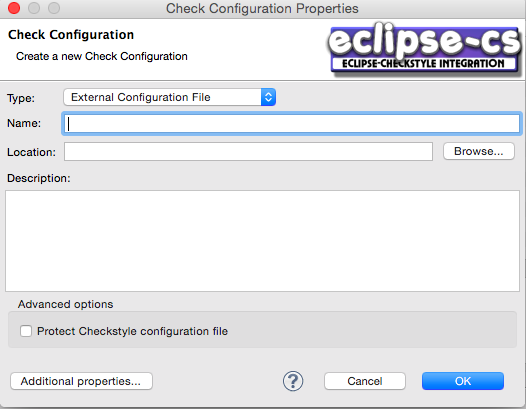
typeに「External Configuration File」を選択、名前を設定しファイルのパスを設定。
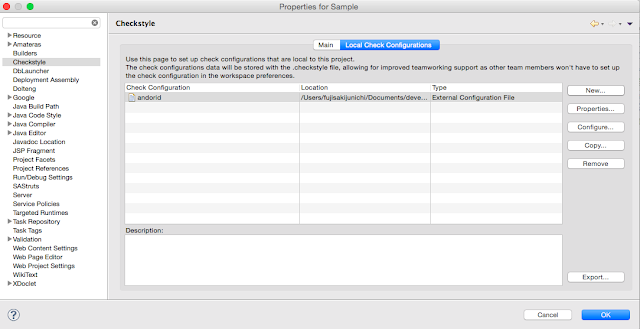
ちゃんと作成されている^^
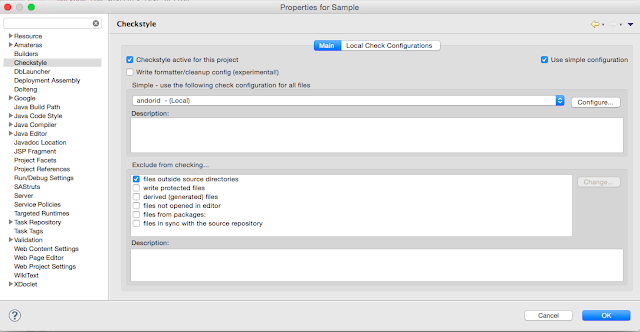
チェックスタイルにAndroidを選択し、適用。するとリビルドされる。
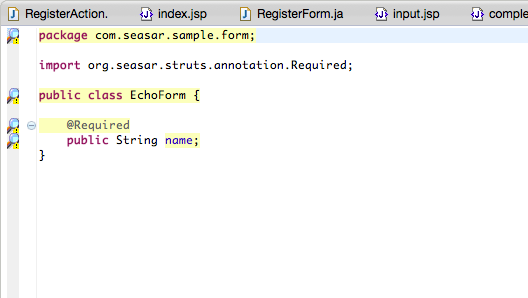
適用後、コーディング規約違反の箇所が黄色くなりマウスを重ねると理由が表示される。
チェックスタイル適用後、グラフ表示してくれたりもする。(Viewを表示)
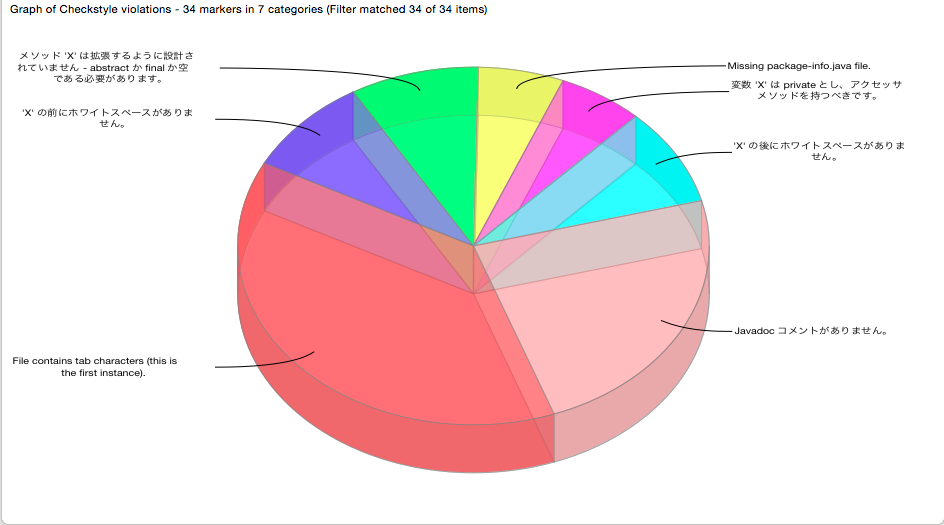
便利~^^
Arduinoと戯れる 8 - EEPROM -
EEPROMを使ってみる
EEPROMArduino UNO R3には、1Kバイトの不揮発性メモリーEEPROMが備わっている。
これを使う事で電源を切ってもデータを保管できる。
1. スケッチの作成
- EEPROM.hのインクルード
- 主な関数
byte EEPROM.read(int adr)
※adr (Arduino UNOの場合は0〜1023)
実際にスケッチを作成してみる
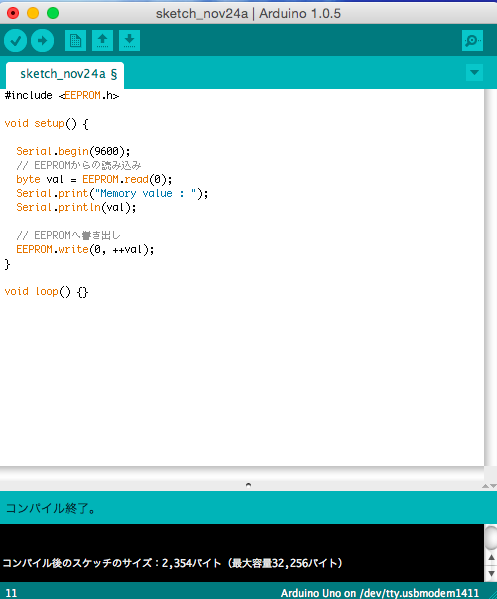
実際にArduinoで動作させてみる
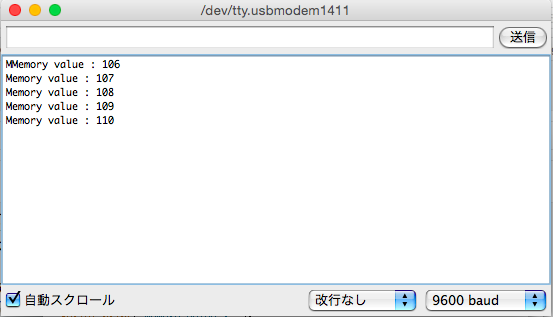
リセットボタンを押す度にカウントアップされる。
容量は少ないけど、ちょっとしたデータを保存しておくには良さげ。
Seasarしてみるさー 3 - SAStrutsで登録画面 -
SAStrutsで簡単な登録画面を作成してみる。
構成としては、入力画面 > 登録処理 > 結果画面 の流れ。入力された内容をセッションに保存し結果画面に表示する。
1. とりあえずアクションを作成。
中身はこんな感じ。
/**
* テスト登録画面アクション
*/
public class RegisterAction {
Logger logger = Logger.getLogger(RegisterAction.class);
@ActionForm
@Resource
protected RegisterForm registerForm;
public String result;
/**
* 入力画面表示
*
* @return 遷移画面
*/
@Execute(validator = false)
public String input() {
return "input.jsp";
}
/**
* 登録処理
*
* @return competeへリダイレクト
*/
@Execute(validator = true, input="input.jsp")
public String register() {
result = registerForm.msg;
return "complete?redirect=true";
}
/**
* 結果画面
*
* @return 遷移画面
*/
@Execute(validator = false)
public String complete() {
return "complete.jsp";
}
}
- <% 〜 %> はJSP自体のタグ。Javaのソース書いたりできる。
- <xxx:yyyy>はJSPを簡単に書けるようにしたタグライブラリ
- ${XXX}はEL式 http://www.techscore.com/tech/Java/JavaEE/JSP/12/
これにhtml + javascript + cssが入って来るのか・・・大変だ><
とりあえず作成した入力画面JSP
<%@ page language="java" contentType="text/html; charset=UTF-8"
pageEncoding="UTF-8"%>
<!DOCTYPE html PUBLIC "-//W3C//DTD HTML 4.01 Transitional//EN" "http://www.w3.org/TR/html4/loose.dtd">
<html>
<head>
<meta http-equiv="Content-Type" content="text/html; charset=UTF-8">
<title>入力画面</title>
</head>
<body>
<h1>入力画面</h1>
<s:form>
<html:textarea property="msg" cols="60" />
<s:submit value="保存" property="register" />
</s:form>
</body>
</html>
s:submitのpropertyで指定されたメソッドへPOSTされる。
んで結果画面のJSP
<%@ page language="java" contentType="text/html; charset=UTF-8"
pageEncoding="UTF-8"%>
<!DOCTYPE html PUBLIC "-//W3C//DTD HTML 4.01 Transitional//EN" "http://www.w3.org/TR/html4/loose.dtd">
<html>
<head>
<meta http-equiv="Content-Type" content="text/html; charset=UTF-8">
<title>結果表示</title>
</head>
<body>
<h1>結果表示</h1>
${result}
</body>
</html>
結果をActionの中でresultに入れそれをEL式で表示。
パッケージ構成はこんか感じ。
ただ、今のままだと値が保存されないので、セッションを利用するように修正。
dtoパッケージにXxxDto を作成。
/**
* セッションDTO
*
* @see Serializable
*/
@Component(instance = InstanceType.SESSION)
public class SessionDto implements Serializable {
/**
* シリアルID
*/
private static final long serialVersionUID = -8645656447885350367L;
/** メッセージ */
public String message;
}
DTOをアクションにDIして使用する。
修正したRegisterAction
/**
* テスト登録画面アクション
*/
public class RegisterAction {
Logger logger = Logger.getLogger(RegisterAction.class);
@ActionForm
@Resource
protected RegisterForm registerForm;
public String result;
@Resource
protected SessionDto sessionDto;
/**
* 入力画面表示
*
* @return 遷移画面
*/
@Execute(validator = false)
public String input() {
return "input.jsp";
}
/**
* 登録処理
*
* @return competeへリダイレクト
*/
@Execute(validator = true, input="input.jsp")
public String register() {
sessionDto.message = registerForm.msg;
return "complete?redirect=true";
}
/**
* 結果画面
*
* @return 遷移画面
*/
@Execute(validator = false)
public String complete() {
result = sessionDto.message;
return "complete.jsp";
}
}
実際に起動して確認!!
サーバーを起動し、http://localhost:8080/SAStrutsTest/register/input へ
入力画面で文字を入力し、POST
入力文字をセッションに保存し、画面に表示
いい感じ^^
HTMLやJSPのプレビューを表示してくれるプラグインインストール
EclipseでHTMLやJSPをコーディングする際にプレビュー見ながら出来たらいいよね〜
という事で見つけてきたのが、「HTMLEditor」
早速インストールしてみる。
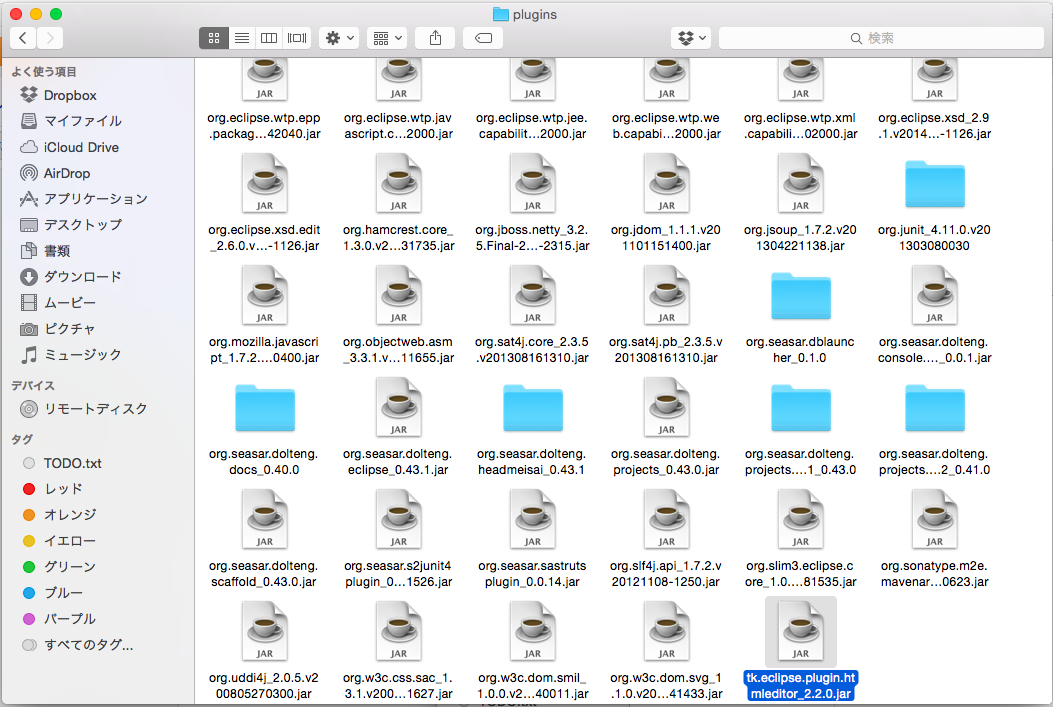
ダウンロードした「tk.eclipse.plugin.htmleditor_2.2.0.jar」をEclipseホーム/pluginsへコピー
Eclipseを再起動!!
確認してみる。
デフォルトのビューワになっていない為、
jsp右クリック > OpenWith > Amateras JSP エディッタで開けた。
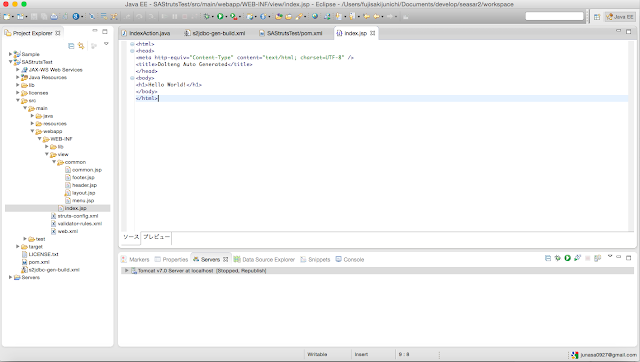
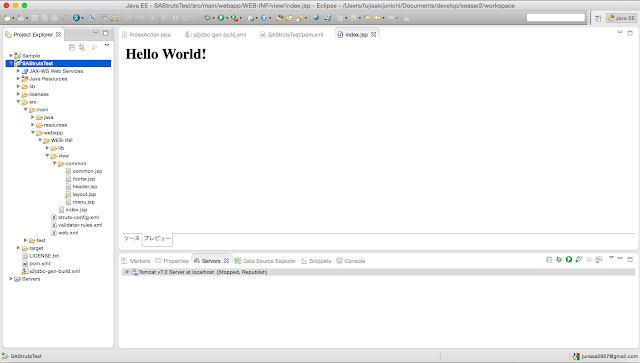
これでは面倒臭いので、デフォルトで開くように設定。
Eclipse > 環境設定 >
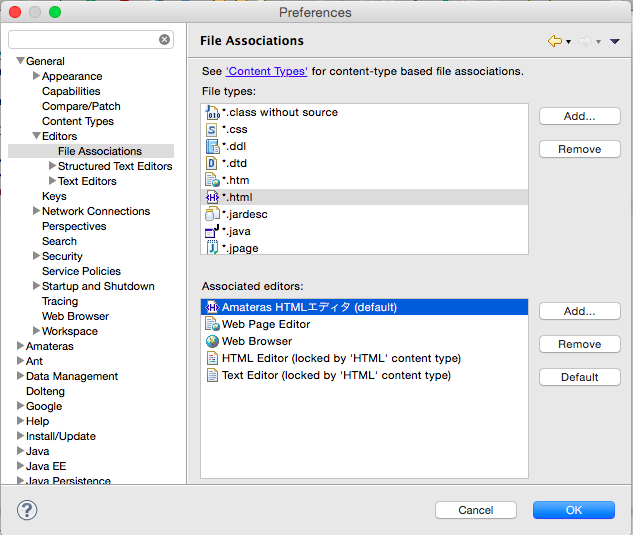
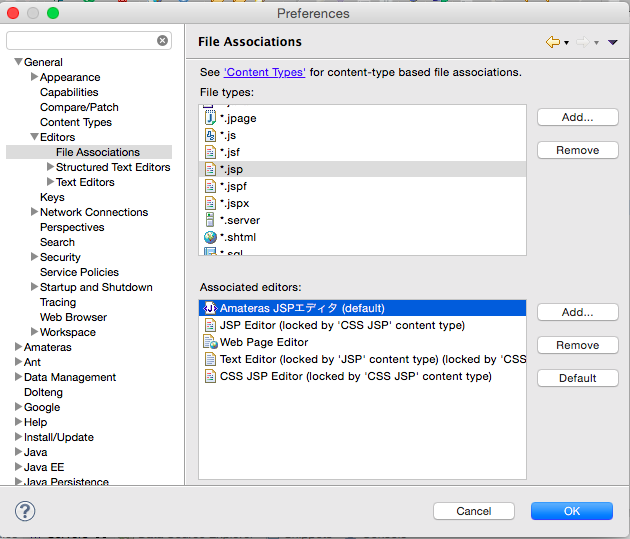
これでOKと思いきや・・・JSPファイルにエラーがっ!?
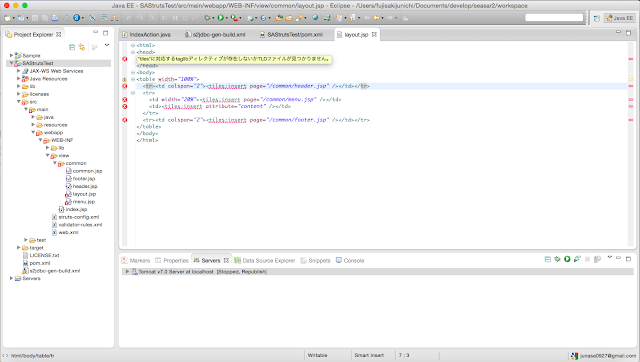
色々調べて以下サイトを発見!!
http://egacreate.blogspot.jp/2009/04/amaterasstruts.html
同じように設定せて、Eclipseを再起動!!
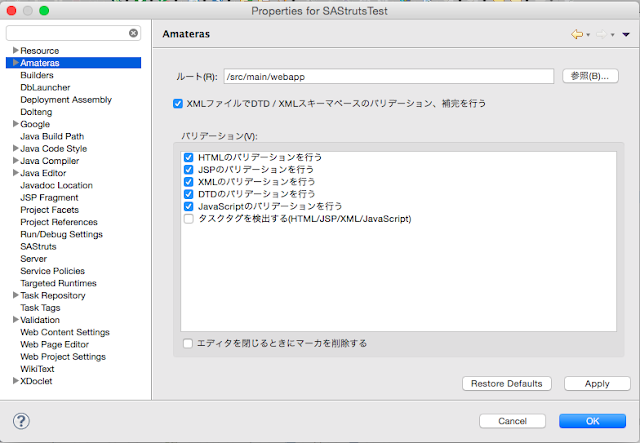
エラーが取れたっぽい^^;
2014年11月16日日曜日
Seasarしてみるさー 2 - SAStrutsプロジェクト作成 -
SAStrutsのプロジェクトを作成してみる
Eclipseの「新規プロジェクト作成」>「Dolteng Project」
以下内容でプロジェクト作成
※WTP(Web Tools Platform)
http://thinkit.co.jp/free/tech/24/1/
「Next」を選択
「finish」で終了。
あとはサーバーViewで右クリック、「Add and Remove」を選択し、
デプロイするプロジェクトを選択
サーバー起動して確認してみる。
アクションを右クリックし、「SAStruts」「View on Server」で確認できる
無事起動!!
Eclipseの「新規プロジェクト作成」>「Dolteng Project」
以下内容でプロジェクト作成
- Application Type : Web Application
- Presentation : SAStruts
- Persistence(永続化) : S2JDBC
- Server Management : WTP
※WTP(Web Tools Platform)
http://thinkit.co.jp/free/tech/24/1/
「Next」を選択
「finish」で終了。
あとはサーバーViewで右クリック、「Add and Remove」を選択し、
デプロイするプロジェクトを選択
サーバー起動して確認してみる。
アクションを右クリックし、「SAStruts」「View on Server」で確認できる
無事起動!!
Seasarしてみるさー 1 - 環境設定 -
Seasarプロジェクト開発環境セットアップ、色々Eclipseにプラグインをインストール
今回インストールするプラグイン- Dolteng
- SAStruts Plugin
- DbLauncher
- S2JUnit4 Plugin
Eclipseのメニューから「ヘルプ」>「新規ソフトウェアのインストール」を選択
作業対象に「http://eclipse.seasar.org/updates/3.3/」を入力
上記項目をチェックし、インストール
※DbLauncherに関してはhttp://eclipse.seasar.org/updates/3.2にある
次にTomcatのインストール
Eclipseの「サーバー」ビューで右クリック、「新規」「サーバー」を選択
Tomcatを選択
次の画面で空のディレクトリー選択して、新規インストールができる〜
みたいな話でしたが、変なエラーがっ!!
という事で地道にTomcat7をインストール。。。
↓ここを参考
http://qiita.com/deconcepter/items/2393cc68d73b19e9ad65
$ cd eclipse/
$ ls
Eclipse.app dropins features plugins
artifacts.xml eclipse notice.html readme
configuration epl-v10.html p2 tomcat
$ cd tomcat/
$ ls
LICENSE RUNNING.txt lib webapps
NOTICE bin logs work
RELEASE-NOTES conf temp
$ cd bin
$ ls
bootstrap.jar setclasspath.sh
catalina-tasks.xml shutdown.bat
catalina.bat shutdown.sh
catalina.sh startup.bat
commons-daemon-native.tar.gz startup.sh
commons-daemon.jar tomcat-juli.jar
configtest.bat tomcat-native.tar.gz
configtest.sh tool-wrapper.bat
daemon.sh tool-wrapper.sh
digest.bat version.bat
digest.sh version.sh
setclasspath.bat
$ sudo chmod +x *.sh
Password:
$ ls -l *.sh
-rwxr-xr-x@ 1 slowhand staff 20779 11 3 11:43 catalina.sh
-rwxr-xr-x@ 1 slowhand staff 1922 11 3 11:43 configtest.sh
-rwxr-xr-x@ 1 slowhand staff 7888 11 3 11:43 daemon.sh
-rwxr-xr-x@ 1 slowhand staff 1965 11 3 11:43 digest.sh
-rwxr-xr-x@ 1 slowhand staff 3547 11 3 11:43 setclasspath.sh
-rwxr-xr-x@ 1 slowhand staff 1902 11 3 11:43 shutdown.sh
-rwxr-xr-x@ 1 slowhand staff 1904 11 3 11:43 startup.sh
-rwxr-xr-x@ 1 slowhand staff 5024 11 3 11:43 tool-wrapper.sh
-rwxr-xr-x@ 1 slowhand staff 1908 11 3 11:43 version.sh
$ ./startup.sh
Using CATALINA_BASE: /Applications/eclipse/tomcat
Using CATALINA_HOME: /Applications/eclipse/tomcat
Using CATALINA_TMPDIR: /Applications/eclipse/tomcat/temp
Using JRE_HOME: /Library/Java/JavaVirtualMachines/jdk1.7.0_60.jdk/Contents/Home
Using CLASSPATH: /Applications/eclipse/tomcat/bin/bootstrap.jar:/Applications/eclipse/tomcat/bin/tomcat-juli.jar
Tomcat started.
$
インストールして起動してみる
起動できてるにゃ〜。
という事でもう一回Eclipseのサーバーを追加してみる。
とりあえず、追加はできたごた〜。
登録:
コメント (Atom)


