ページ

2015年7月31日金曜日

道の駅を巡ってみる 2 - 福岡と宮崎 -

2箇所か巡った分をまとめて投稿

まずは「小石原
福岡県の東南部にあって、中には陶芸コーナーが沢山あります。


残念ながら当日は土砂降り >< 外観を撮れないまま中へ。
ずぶ濡れになりながら店内を物色していると面白いものを発見^^


◯◯の時に使う用の塩セットが売られていました。
左から「アンデスの紅塩」× 2、「天ぷら塩」、「白ごはん塩」、「焼き肉塩」。

あと、小石原とは全然関係無いのですが飲んでみたかったので購入↓。


シークワサーのような柑橘系の味がして美味しかったです。


次は「田野
こちらは宮崎に行った際に寄った道の駅です。周辺には放牧地が広がっておりヤギがいました^^


↓ヤギ


何回か撮ってやっとこちらを見てくれました^^;


2015年7月30日木曜日

AndroidでのCanvas#drawText

AndroidでCanvas#drawTextを使って文字表示する時のサイズ設定

onDrawなどで、Canvas#drawTextを使って文字を表示させる時に
Paint#setTextSizeでテキストサイズを指定しても端末間の解像度の違いは
考慮してくれない 
そこでTextView#setTextSizeを参考にして実装した時のメモ

TextView#setTextSize


/**
 * Set the default text size to a given unit and value.  See {@link
 * TypedValue} for the possible dimension units.
 *
 * @param unit The desired dimension unit.
 * @param size The desired size in the given units.
 *
 * @attr ref android.R.styleable#TextView_textSize
 */
public void setTextSize(int unit, float size) {
    Context c = getContext();
    Resources r;

    if (c == null)
        r = Resources.getSystem();
    else
        r = c.getResources();

    setRawTextSize(TypedValue.applyDimension(
            unit, size, r.getDisplayMetrics()));
}
これを見るとTypedValue#applyDimensionで
解像度を考慮したサイズに変換している事が分かる

TypedValue#applyDimension


/**
  * Converts an unpacked complex data value holding a dimension to its final floating
  * point value. The two parameters <var>unit</var> and <var>value</var>
  * are as in {@link #TYPE_DIMENSION}.
  *
  * @param unit The unit to convert from.
  * @param value The value to apply the unit to.
  * @param metrics Current display metrics to use in the conversion --
  *                supplies display density and scaling information.
  *
  * @return The complex floating point value multiplied by the appropriate
  * metrics depending on its unit.
  */
 public static float applyDimension(int unit, float value,
                                    DisplayMetrics metrics)
 {
     switch (unit) {
     case COMPLEX_UNIT_PX:
         return value;
     case COMPLEX_UNIT_DIP:
         return value * metrics.density;
     case COMPLEX_UNIT_SP:
         return value * metrics.scaledDensity;
     case COMPLEX_UNIT_PT:
         return value * metrics.xdpi * (1.0f/72);
     case COMPLEX_UNIT_IN:
         return value * metrics.xdpi;
     case COMPLEX_UNIT_MM:
         return value * metrics.xdpi * (1.0f/25.4f);
     }
    return 0;
 }
テキストサイズなので引数のunitにはCOMPLEX_UNIT_SPを指定
以上を考慮してサイズ変換メソッドを作成
/**
* 端末に最適化したテキストサイズを取得
*
* @param context コンテキスト
* @param size 元サイズ
* @return 最適化されたテキストサイズ
*/
public static float toDimensionTextSize(Context context, float size) {

    Resources r;
    if (context == null) {
        r = Resources.getSystem();

    } else {
         r = context.getResources();
    }
    return TypedValue.applyDimension(
        TypedValue.COMPLEX_UNIT_SP, size, r.getDisplayMetrics());
}
Paint#setTextSize時にこのメソッドを呼ぶ
  paint.setTextSize(toDimensionTextSize(getContext(), 10.0f));

2015年7月26日日曜日

Elixir/Phoenixで遊ぶ 2 - Phoenix環境作成 -

Phoenixのインストール&実行

インストール


前回まではChef-soloを使って構築したが、Phoenixのインストールに関してはChef-soloを使うまでもなさそうなので手動でインストール
  • Hexパッケージマネージャをインストール
$ mix local.hex

Are you sure you want to install archive https://s3.amazonaws.com/s3.hex.pm/installs/1.0.0/hex.ez? [Yn] Y
2015-07-25 16:06:19 URL:https://s3.amazonaws.com/s3.hex.pm/installs/1.0.0/hex.ez [269416/269416] -> "/home/vagrant/.mix/archives/hex.ez" [1]
* creating .mix/archives/hex.ez
  • phoenixインストール
$ mix archive.install https://github.com/phoenixframework/phoenix/releases/download/v0.13.1/phoenix_new-0.13.1.ez

Are you sure you want to install archive https://github.com/phoenixframework/phoenix/releases/download/v0.13.1/phoenix_new-0.13.1.ez? [Yn] Y
* creating .mix/archives/phoenix_new-0.13.1.ez

サンプルプロジェクト作成


  • sample-phoenixプロジェクト作成
$ mix phoenix.new sample_phoenix

* creating sample_phoenix/config/config.exs
* creating sample_phoenix/config/dev.exs
* creating sample_phoenix/config/prod.exs
* creating sample_phoenix/config/prod.secret.exs
* creating sample_phoenix/config/test.exs
* creating sample_phoenix/lib/sample_phoenix.ex
* creating sample_phoenix/lib/sample_phoenix/endpoint.ex
* creating sample_phoenix/priv/static/robots.txt
* creating sample_phoenix/test/controllers/page_controller_test.exs
* creating sample_phoenix/test/views/error_view_test.exs
* creating sample_phoenix/test/views/page_view_test.exs
* creating sample_phoenix/test/support/conn_case.ex
* creating sample_phoenix/test/support/channel_case.ex
* creating sample_phoenix/test/test_helper.exs
* creating sample_phoenix/web/controllers/page_controller.ex
* creating sample_phoenix/web/templates/layout/application.html.eex
* creating sample_phoenix/web/templates/page/index.html.eex
* creating sample_phoenix/web/views/error_view.ex
* creating sample_phoenix/web/views/layout_view.ex
* creating sample_phoenix/web/views/page_view.ex
* creating sample_phoenix/web/router.ex
* creating sample_phoenix/web/web.ex
* creating sample_phoenix/mix.exs
* creating sample_phoenix/README.md
* creating sample_phoenix/lib/sample_phoenix/repo.ex
* creating sample_phoenix/test/support/model_case.ex
* creating sample_phoenix/.gitignore
* creating sample_phoenix/brunch-config.js
* creating sample_phoenix/package.json
* creating sample_phoenix/web/static/css/app.scss
* creating sample_phoenix/web/static/js/app.js
* creating sample_phoenix/web/static/vendor/phoenix.js
* creating sample_phoenix/priv/static/images/phoenix.png

Fetch and install dependencies? [Yn] Y

Phoenix uses an optional assets build tool called brunch.io
that requires node.js and npm. Installation instructions for
node.js, which includes npm, can be found at http://nodejs.org.

After npm is installed, install your brunch dependencies by
running inside your app:

    $ npm install

If you don't want brunch.io, you can re-run this generator
with the --no-brunch option.

* running mix deps.get

We are all set! Run your Phoenix application:

    $ cd sample_phoenix
    $ mix phoenix.server

You can also run it inside IEx (Interactive Elixir) as:

    $ iex -S mix phoenix.server
  • サーバー起動
$ cd sample_phoenix
$ mix phoenix.server
・・・
[info] Running SamplePhoenix.Endpoint with Cowboy on port 4000 (http)
[error] Could not start watcher "node", executable does not exist
なんかエラーがっ!!
どうやらnode.jsが必要らしい>< ってプロジェクト作成時にコンソールに出てますね^^; 
  • epelリポジトリからインストール実施
$ rpm -ivh http://ftp.iij.ad.jp/pub/linux/fedora/epel/6/x86_64/epel-release-6-8.noarch.rpm
$ yum -y install nodejs npm --enablerepo=epel
  • 再度サーバー起動
$ mix phoenix.server
[info] Running SamplePhoenix.Endpoint with Cowboy on port 4000 (http)

module.js:340
    throw err;
          ^
Error: Cannot find module '/home/vagrant/sample_phoenix/node_modules/brunch/bin/brunch'
    at Function.Module._resolveFilename (module.js:338:15)
    at Function.Module._load (module.js:280:25)
    at Function.Module.runMain (module.js:497:10)
    at startup (node.js:119:16)
    at node.js:929:3
またまたエラーがっorz
localhost:4000にアクセスしてみるとこれじゃない感の画面が表示される

これもプロジェクト作成時に出てる通りnode.jsがインストールされていないせいで brunch.ioが使えていないから
  • という事で再度プロジェクトの作り直し
$ mix phoenix.new sample_phoenix
・・・ 省略 ・・・
Fetch and install dependencies? [Yn] Y
* running npm install
* running mix deps.get


We are all set! Run your Phoenix application:

    $ cd sample_phoenix
    $ mix phoenix.server

You can also run it inside IEx (Interactive Elixir) as:

    $ iex -S mix phoenix.server

  • 再度サーバー起動しlocalhost:4000にアクセスしてみる

今度はちゃんと表示されました^^

2015年7月25日土曜日

Elixir/Phoenixで遊ぶ 1 - ChefでElixir環境作成 -

最近よく聞くElixir/Phoenixを使ってみる

Elixirとは
Erland VM上で動作するRubyに似た関数型言語
Phoenixとは
Elixirで実装されたウェブアプリケーションフレームワーク
Railsによく似ている(作者がRailsコミッタでもある)

環境作成


環境はVagrant(CentOS)+chef-soloで作成したいと思います。
Vagrantの環境作成はこちら, Chefの環境作成はこちらを参照
  • まずは専用のVagrantを作成
$ vagrant box list
centos6  (virtualbox, 0)
$ vagrant init centos6
Vagrantfileを以下に編集
1. ↓コメントアウト + port:4000をforwardするように修正
config.vm.network "forwarded_port", guest: 4000, host: 4000
2. ↓コメントアウト
config.vm.network "private_network", ip: "192.168.33.10"
vagrant起動
$ vagrant up
  • ssh設定
ssh.configにIPとホスト名の紐付けを行う
$ vagrant ssh-config --host elixir-phoenix >> ~/.ssh/config
ホスト名はelixir-phoenix
  • サーバーにchef-soloインストール
$ knife solo prepare elixir-phoenix

Cookbook作成


  • Elixirインストール用Cookbookの作成
$ knife cookbook create elixir -o site-cookbooks
各ファイルを以下内容で作成
Berksfile
source "https://supermarket.chef.io"
cookbook 'elixir', path: 'site-cookbooks/elixir'
metadata.rb
name             'elixir'
maintainer       '{name}'
maintainer_email '{name}@gmail.com'
license          'All rights reserved'
description      'Installs/Configures elixir'
long_description IO.read(File.join(File.dirname(__FILE__), 'README.md'))
version          '0.1.0'

depends "git"
depends "github"
depends "erlang"
attributes/default.rb
default['elixir']['version'] = '1.0.5'
default['elixir']['home'] = '/usr/local/elixir'
default['elixir']['link'] = '/usr/local/elixir/bin'
default['elixir']['repo'] = "https://github.com/elixir-lang/elixir.git"
default['elixir']['source']['path'] = '/usr/local/elixir/src'
recipes/default.rb
# install erlang
node.set[:erlang][:install_method]    = "source"
node.set[:erlang][:source][:version]  = "18.0"
node.set[:erlang][:source][:url]      = "http://erlang.org/download/otp_src_#{node[:erlang][:source][:version]}.tar.gz"
node.set[:erlang][:source][:checksum] = "a0b69da34b4f218eb7d63d9e96fc120aa7257bb6c37a0f40fb388e188b4111aa"

include_recipe "erlang::default"
include_recipe "git::default"

# create directory
directory node[:elixir][:home] do
  owner 'vagrant'
  group 'vagrant'
  mode '0755'
  action :create
end

# git clone to specified dir
git "elixir" do
  repository node[:elixir][:repo]
  revision "v#{node[:elixir][:version]}"
  destination node[:elixir][:source][:path]
  action :sync
end

# make
bash "make" do
  cwd node[:elixir][:source][:path]
  code "make"
  action :run
end

# create symbolic link
link node[:elixir][:link] do
  to "#{node[:elixir][:source][:path]}/bin"
end

# setting PATH environment variable
template "/etc/profile.d/elixir.sh" do
  mode 0755
  source "elixir.sh.erb"
  variables(:elixir_home => node[:elixir][:home])
end
※ erlangのotp_src_XXX.tar.gzだが、checksumが公式サイト
checksumを指定した所Chef::Exceptions::ChecksumMismatchが発生
ファイル自体破損してなさそう・・・?仕方ないのでトレースからchecksumをコピーしました
  • Chef-soloを実行
$ knife solo cook elixir-phoenix

正常に終了したらssh elixir-phoenixでサーバーへログイン
Interactive mode(rubyでいうirb)を試してみる
[vagrant@localhost ~]$ iex
Erlang/OTP 18 [erts-7.0] [source] [64-bit] [async-threads:10] [hipe] [kernel-poll:false]

Interactive Elixir (1.0.5) - press Ctrl+C to exit (type h() ENTER for help)
iex(1)> 40+2
42
iex(2)> "hello" <> " world"
"hello world"
iex(3)>
BREAK: (a)bort (c)ontinue (p)roc info (i)nfo (l)oaded
       (v)ersion (k)ill (D)b-tables (d)istribution

a
ちゃんと動作できてればOK
今回はここまで、次はPhoenixのインストールを実施!!

elixirのcookbookはこちらに公開しています。

2015年7月22日水曜日

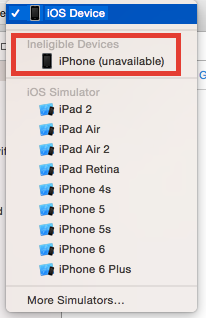
Xcode Version 7.0 beta 3でIneligible Deviceとなる件

Xcode7から実機でデバッグが可能になるので早速beta版で試してみたら・・・


実機が認識されていない ><
Deployment Targetも起動時に9.0になっている箇所を8.4に変更してみたけどダメでした。

色々調べて結局Xcode7 beta3がiOS8.3までしかサポートされてない事が判明 orz
※実機は8.4

Xcode6からiOS8.4のDiskImageをコピー
・コピー元
    Xcode.app/Contents/Developer/Platforms/iPhoneOS.platform/DeviceSupport/8.4 (12H141)


・コピー先
    Xcode-beta.app/Contents/Developer/Platforms/iPhoneOS.platform/DeviceSupport/

Xcode7 beta3を再起動してやると・・


ちゃんと実機が選択できます。
↓実機でデバッグ


2015年7月20日月曜日

SwiftでのXCTest

XCTestを使ってみる

※Xcode Version 6.4で確認

プロジェクトを新規作成した時にテストプロジェクトも一緒に作られる


プロジェクト作ったばっかりのコードはこんな↓
import UIKit
import XCTest

class SampleTests: XCTestCase {

    override func setUp() {
        super.setUp()
        // Put setup code here. This method is called before the invocation of each test method in the class.
     }

    override func tearDown() {
        // Put teardown code here. This method is called after the invocation of each test method in the class.
        super.tearDown()
    }

    func testExample() {
        // This is an example of a functional test case.
        XCTAssert(true, "Pass")
    }

    func testPerformanceExample() {
        // This is an example of a performance test case.
        self.measureBlock() {
            // Put the code you want to measure the time of here.
        }
    }

}

・setUp()
    メソッド内でテスト開始前の準備を行う
・tearDown()
    メソッド内でテスト終了時の後片付けを行う
・testExample()
    サンプル。必ずテストが成功する
・testPerformanceExample()
    パフォーマンス計測テストのサンプル
    measureBlock内に計測したメソッドや処理を記述する

テストの実行方法
テストの実行方法は以下の2通り

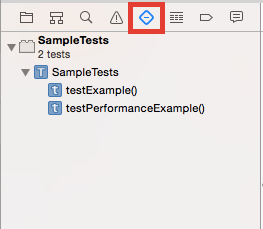
1. Test navigatorから実行


カーソルをテストクラス(SampleTests)か、各テストメソッド(testExample, testPerformanceExample)にあわせると実行ボタンが表示される


2. ソースコード上から実行
テストクラスを選択し、ソースコードを表示。左側のひし形にカーソルを
合わせると実行ボタンが表示される


実行してみる
・テストに成功するとひし形の箇所が緑色に変わる


※パフォーマンス計測のテストを実行した際は計測結果を表示することができる


↑赤枠の箇所をクリックと計測結果が表示される


・テストに失敗した場合、失敗した箇所のひし形が赤色に変わる


Assertメソッド一覧

  • XCTFail (format…)
          常に失敗となる。エラーハンドリングの時に使用する。
  • XCTAssertNil (a1, format…)
          Nilチェック。a1がNilでない場合失敗となる。        
  • XCTAssertNotNil (a1, format…)
          Nilチェック。a1がNilの場合失敗となる。
  • XCTAssert (a1, format…)
          a1がtrueの場合成功、falseの場合失敗となる。
  • XCTAssertTrue (a1, format…)
          a1がtrueの場合成功、falseの場合失敗となる。
  • XCTAssertFalse (a1, format…)
          a1がfalseの場合成功、trueの場合失敗となる。
  • XCTAssertEquals (a1, a2, format…)
          a1とa2が等しい場合成功。
          ※swiftではスカラー型もObjectも区別しないのでXCTAssertEqualsObjectsは存在しない
  • XCTAssertEqualsWithAccuracy (a1, a2, accuracy, format…)
          a1とa2の誤差がaccuracy内であれば成功。
  • XCTAssertGreaterThan (a1, a2, format…)
          a1がa2より大きい場合成功。
  • XCTAssertGreaterThanOrEqual (a1, a2, format…)
          a1がa2以上の場合成功。
  • XCTAssertLessThan (a1, a2, format…)
          a1がa2より小さい場合成功。
  • XCTAssertLessThanOrEqual (a1, a2, format…)
          a1がa2以下の場合成功。


2015年7月13日月曜日

FragmentがActivityからAtachされているか判定

タイミングによって、Fragment内でgetString(R.string.〜)を使った際に
ActivityからAtachされてないとこける。

java.lang.IllegalStateException: Fragment XXXXX not attached to Activity

これはgetString内のgetResourcesでActivityからのAtachチェックを行っている為。
↓ android.app.Framgnet.java 抜粋
 final public Resources getResources() {
     if (mActivity == null) {
         throw new IllegalStateException("Fragment " + this + " not attached to Activity");
     }
     return mActivity.getResources();
 }

回避策としてFrament#isAddedでチェックする
↓ android.app.Framgnet.java 抜粋
final public boolean isAdded() {
     return mActivity != null && mAdded;
 }

例) ActivityからAtachされる前にスレッド実行する際にisAddedメソッドでチェック
@Override
protected void onPostExecute(Void result){
    if(isAdded()){
        getResources().getString(R.string.app_name);
    }
}

mAddedに関して
mAdded(boolean)はFragmentManagerの以下メソッドで設定している
・mAdded = true
public void addFragment(Fragment fragment, boolean moveToStateNow) {
    if (mAdded == null) {
        mAdded = new ArrayList<Fragment>();
    }
    if (DEBUG) Log.v(TAG, "add: " + fragment);
    makeActive(fragment);
    if (!fragment.mDetached) {
        if (mAdded.contains(fragment)) {
            throw new IllegalStateException("Fragment already added: " + fragment);
        }
        mAdded.add(fragment);
        fragment.mAdded = true;
        fragment.mRemoving = false;
        if (fragment.mHasMenu && fragment.mMenuVisible) {
            mNeedMenuInvalidate = true;
        }
        if (moveToStateNow) {
            moveToState(fragment);
        }
   }
}

・mAdded = false
public void removeFragment(Fragment fragment, int transition, int transitionStyle) {
    if (DEBUG) Log.v(TAG, "remove: " + fragment + " nesting=" + fragment.mBackStackNesting);
    final boolean inactive = !fragment.isInBackStack();
    if (!fragment.mDetached || inactive) {
        〜中略〜
        if (mAdded != null) {
            mAdded.remove(fragment);
        }
        if (fragment.mHasMenu && fragment.mMenuVisible) {
            mNeedMenuInvalidate = true;
        }

    if (!fragment.mDetached) {
        if (mAdded.contains(fragment)) {
            throw new IllegalStateException("Fragment already added: " + fragment);
        }
        fragment.mAdded = false;
        fragment.mRemoving = true;
        moveToState(fragment, inactive ? Fragment.INITIALIZING : Fragment.CREATED,
                    transition, transitionStyle, false);
   }
}

※上記に関してはandroid.support.v4.app.Fragmentでも同じ